
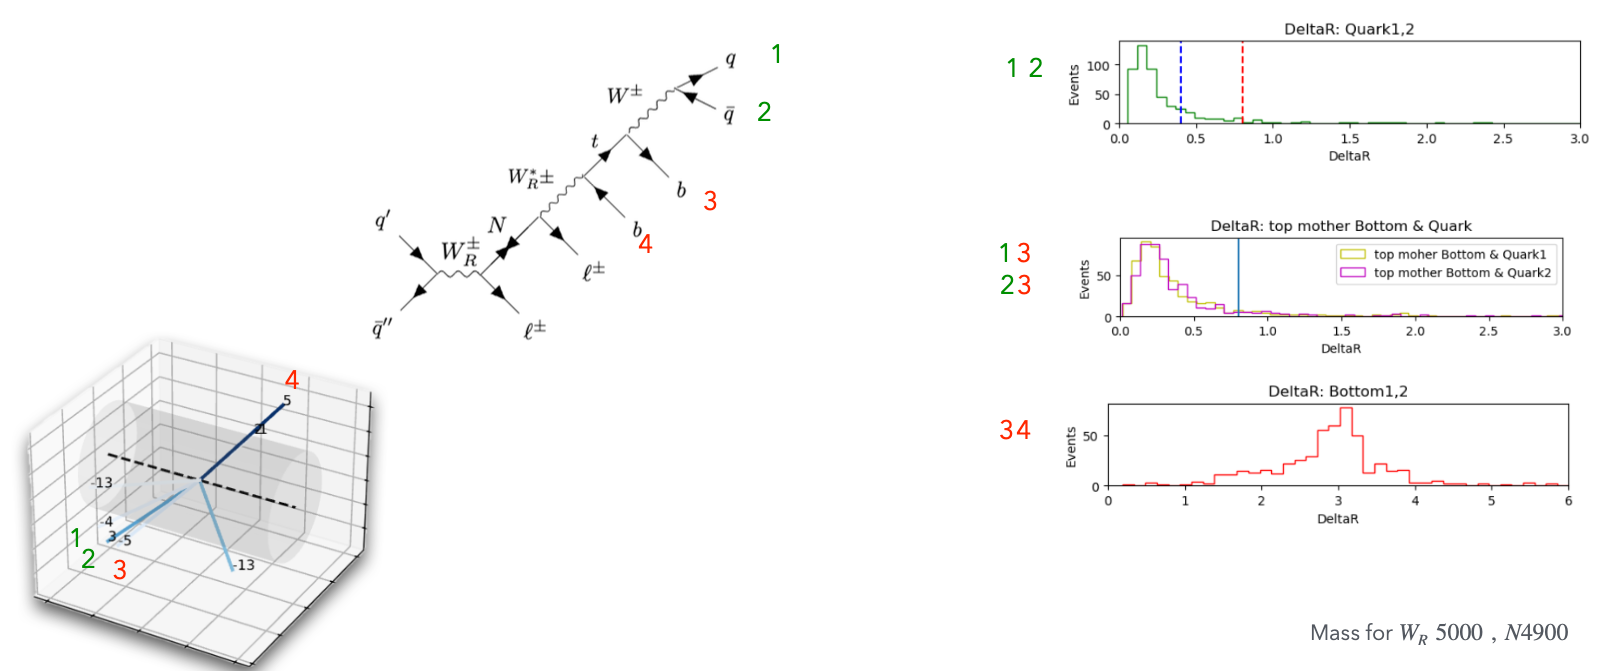
LRSM WR→tb Channel Analysis
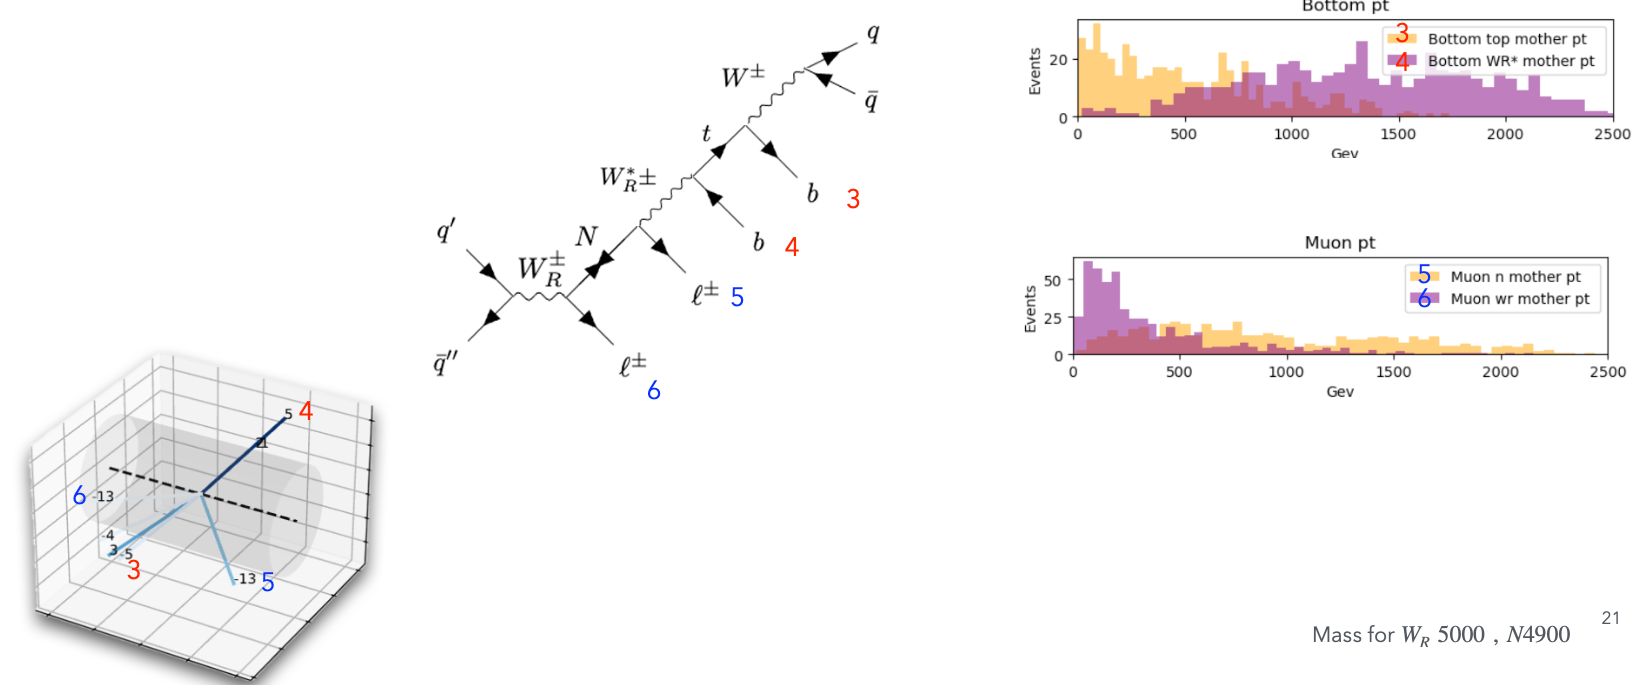
Decay channel: WR→e/μ + N→e/μ + WR*→tb

1. Introduction
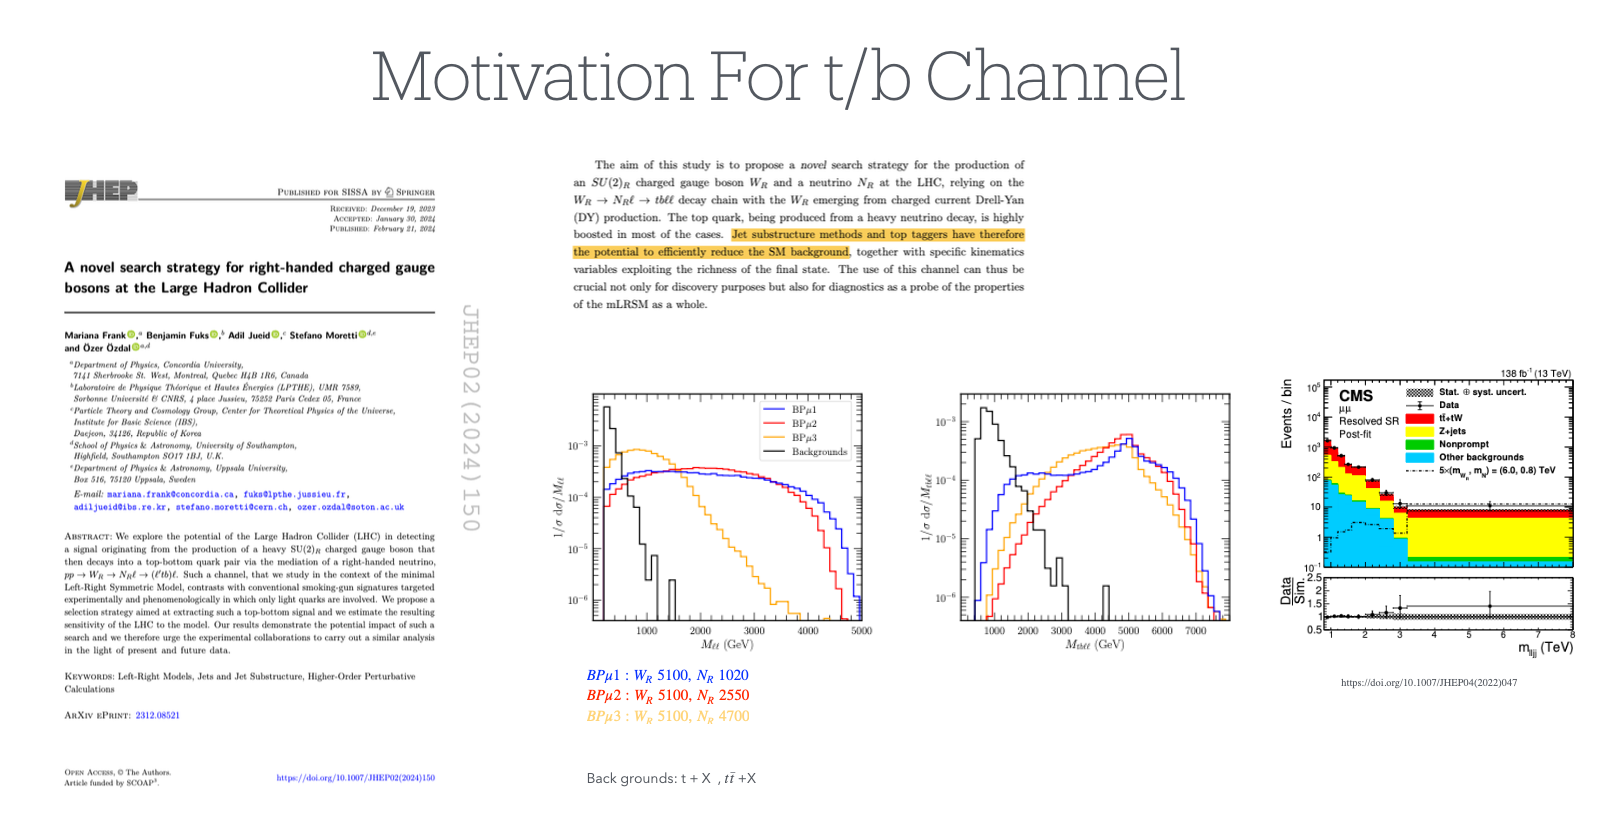
1.1 Motivation and Channel Selection
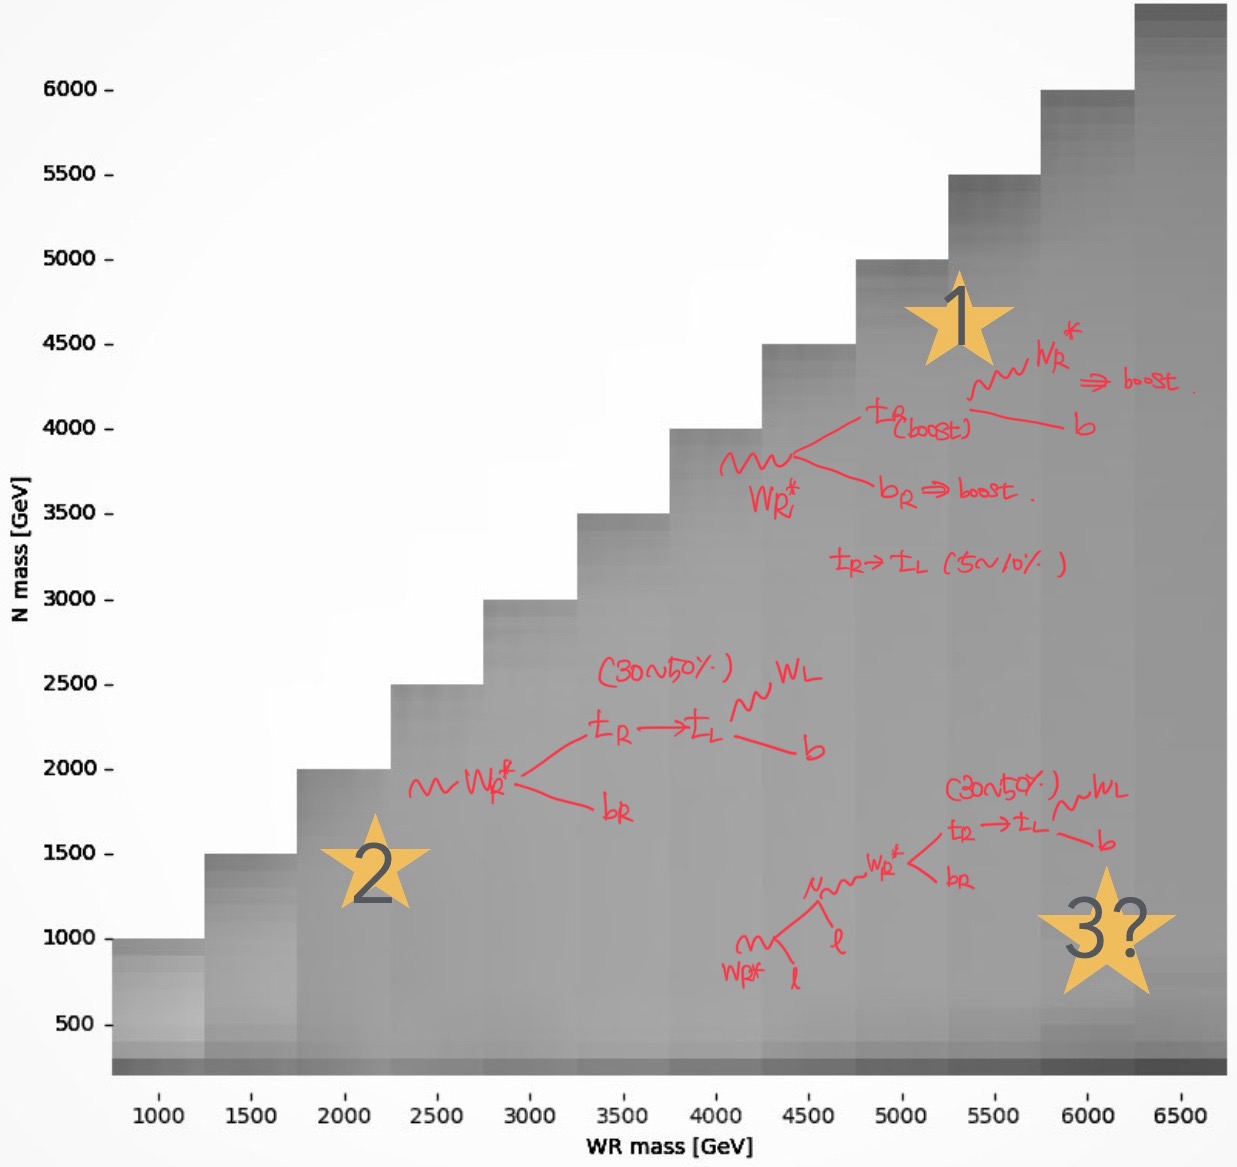
Previous research focused on the WR high, N low region where N particles are highly boosted, causing jets to cluster together. The primary decay modes studied were WR*→ud, sc channels, which produce at most 3 substructures (q, q, τ) within a single AK8 jet.
In this channel, due to using 2 lepton and top tagging and b tagging also with high m_ll, we can reduce lot of backgrounds and also improvements in WR ~ N region in the previous study.
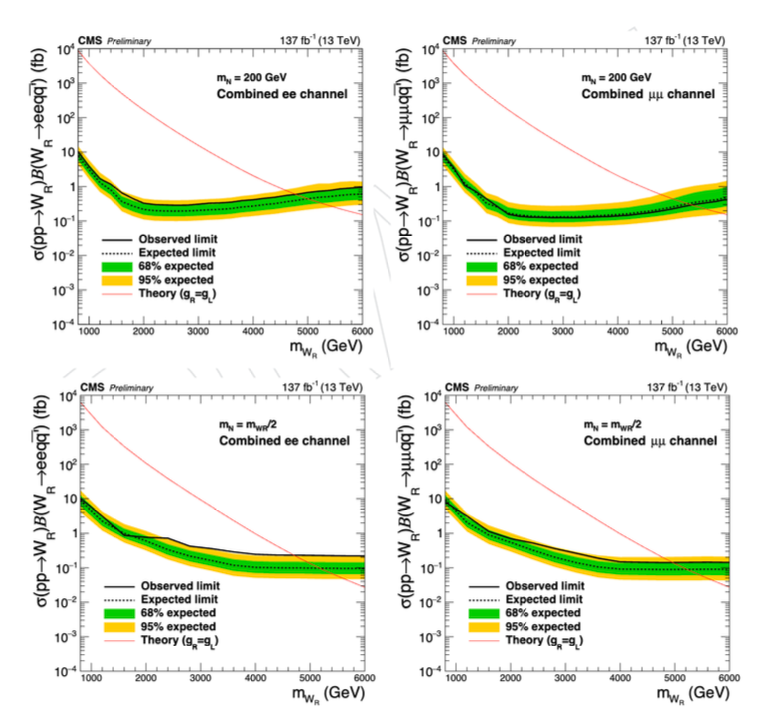
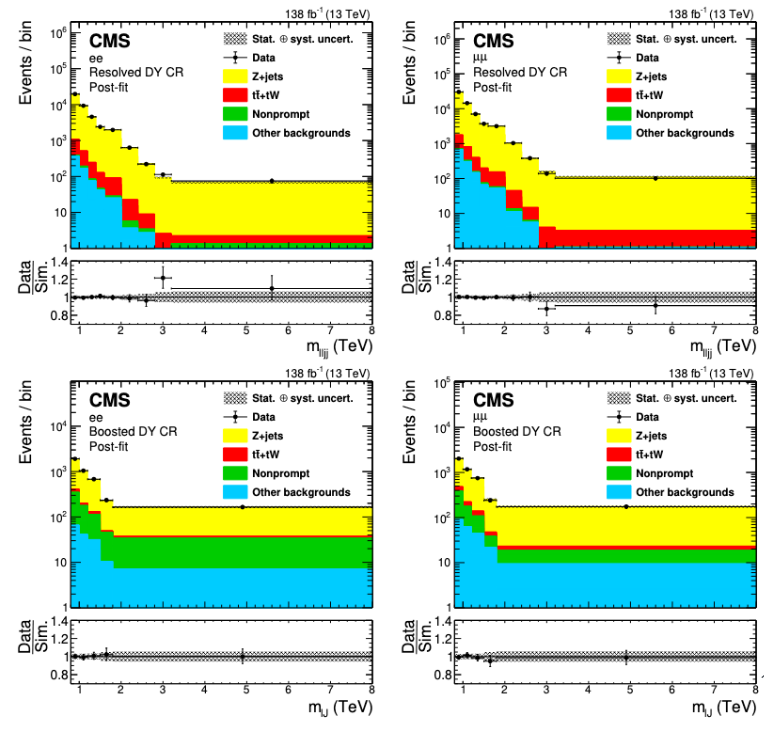
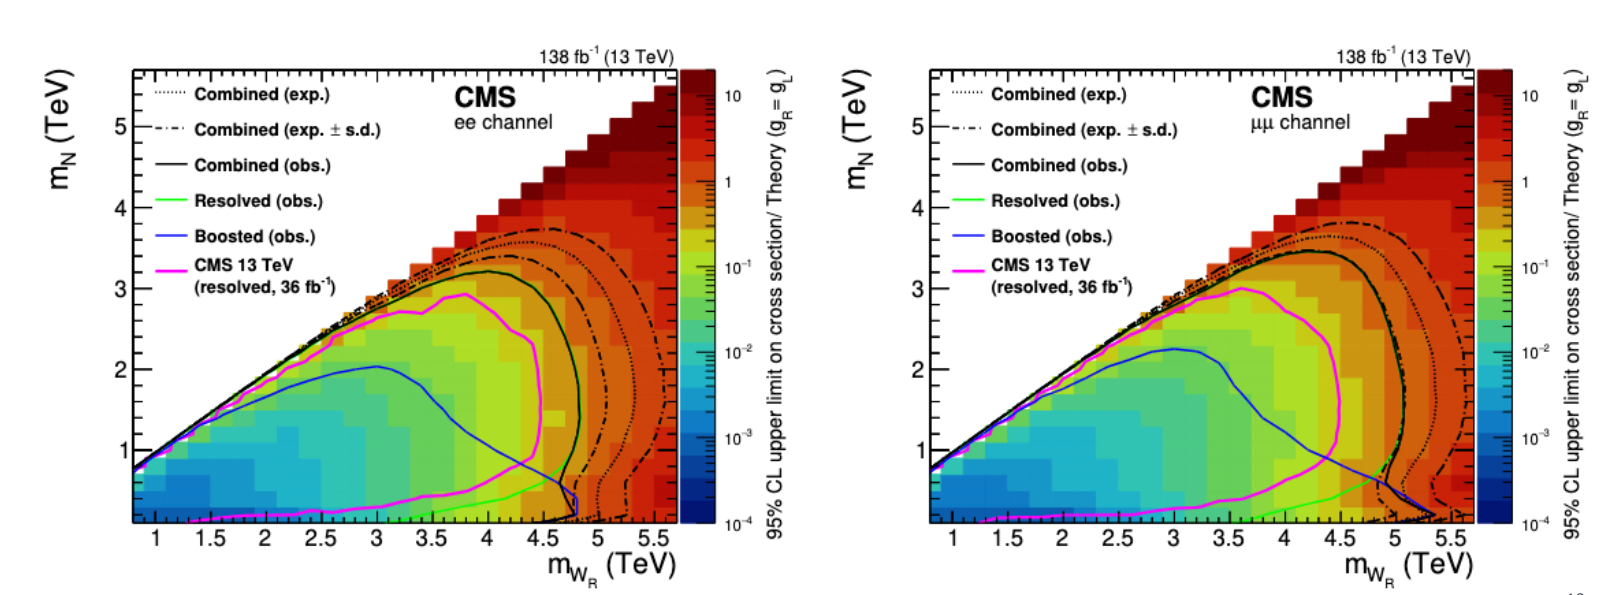
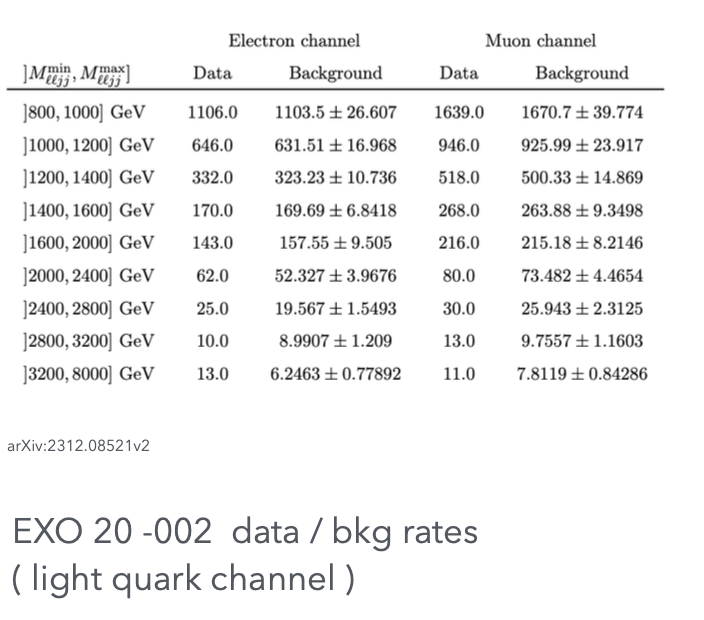
Previous study data (EXO-20-002)
1.2 Challenge with tb Channel
Extending the analysis to include the tb decay channel presents kinematic challenges:
-
Top quark rapid decay: t → b + W, where W further decays to either:
- Hadronic: qq̄ (~70% BR)
- Leptonic: l_nu (~30% BR)
- Boosted regime complexity: In the WR » N mass regime, all decay products (3 jets from top, b quark, lepton) become highly boosted, creating 5 substructures within a single cone - making reconstruction difficult.
1.3 Proposed Solution: WR ~ N Mass Region
Strategy: Target the WR ~ N mass region where:
- N becomes resolved: Lepton and off-shell WR* separate
- Similar kinematics: Off-shell WR* has similar mass to N, leading to comparable momentum
- Separable final states: When WR* → tb, the top and bottom quarks can be distinguished using AK4 jets
- T,B-tagging capability: b quarks (from and WR* decay) can be identified using b-tagging, and top quark can be Top tagged
1.4Analysis Variables and Cuts
Key invariant masses:
- M_{lltb}: Full system invariant mass
- M_{ll}: Dilepton invariant mass (peaks at ~90 GeV for Z resonance)
Selection considerations:
- Fat jet pT cut at 200 GeV may handle lepton selection
- In boosted regimes, leptons correlate with jet boost → additional lepton cuts may be needed
- M_ll particularly useful for boosted leptons due to Z peak structure
- More study needed
1.5 Top Decay Complications in LRSM
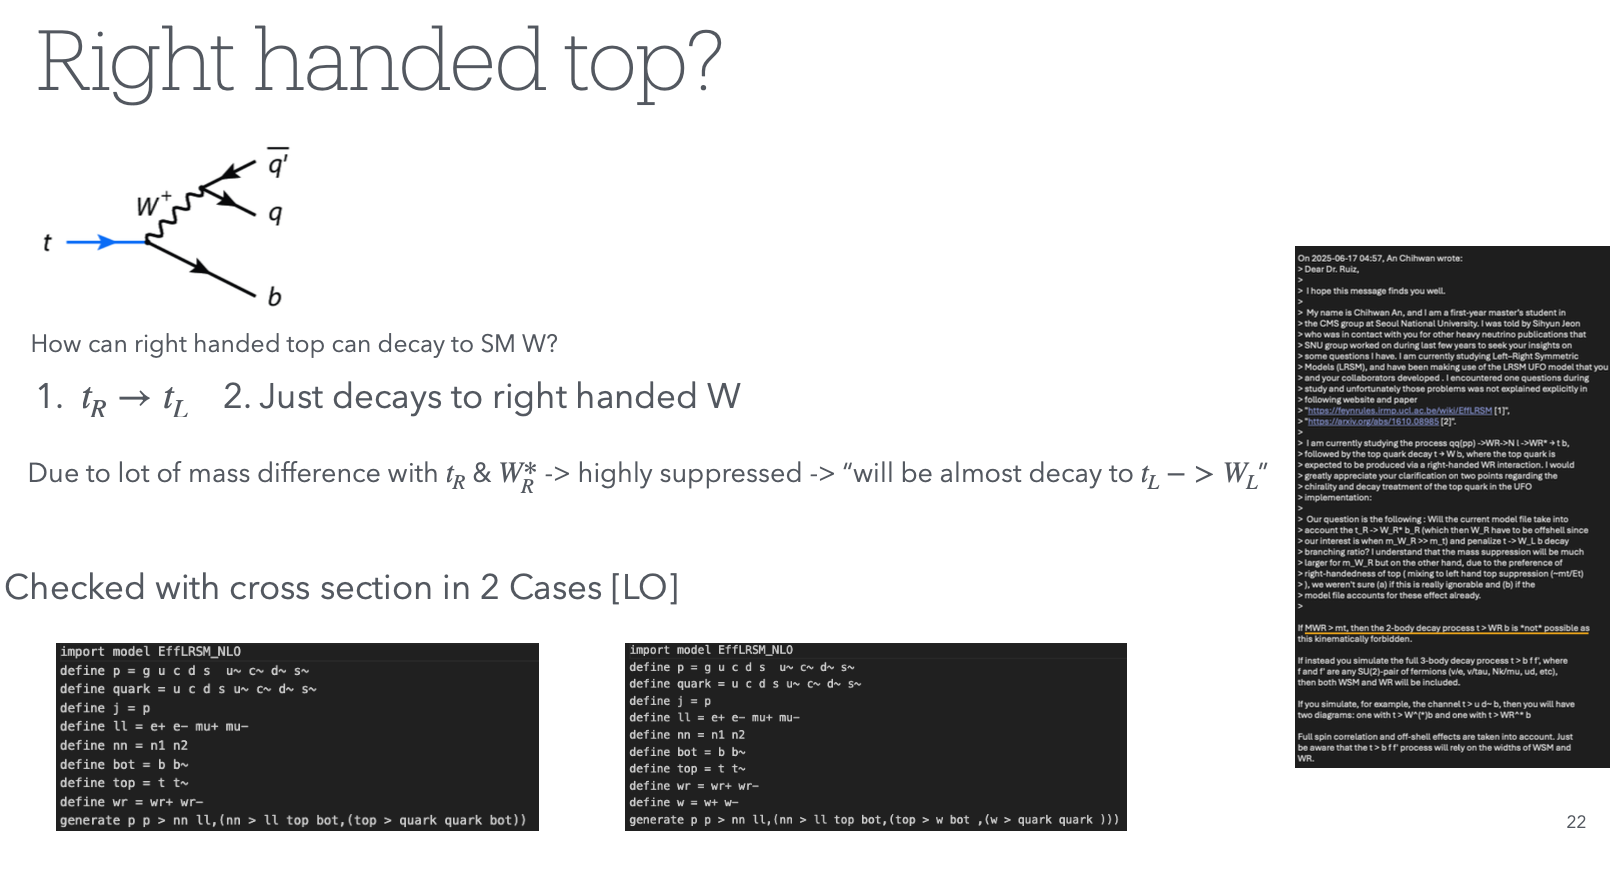
Chirality constraints: Since q_T originates from W_R* with right-handed chirality, all subsequent decay products maintain right-handed chirality. This leads to t → W_R b_R instead of the SM decay t → W_L b.
Key challenges:
- Non-SM decay mode: Need to account for W_R b_R decay channel separately
- Off-shell WR suppression: Since W_R decays off-shell near top mass, cross-section significantly reduced for massive W_R. Leptonic channels become negligible.
-
Chirality flip probability: For WL production, chirality flip required with probability ~ m_T/E_T
- Example: 3 TeV WR → t(1.5 TeV) + b(1.5 TeV) → <10% flip probability
- Results in SM-like W boson production
Mass regime dependencies:
- Low WR (top-resolved): Both WL and WR decay modes possible with finite probabilities
- High WR (top-boosted): Predominantly WR decay, difficult to observe due to off-shell nature
Alternative approach: In high WR, low N region, if initial WR is off-shell, reduced top boost enables WL decay mode.
MadGraph simulation setup:
- Top couples to both WR and WL: t → (WR + WL)b vs t → WL b
- Off-shell WR → qq: t → (qq)b process
- Comparative study: (WL + WR) vs (WL) only
- Investigation of automatic chirality flip handling in LRSM
Results:
- Combined (WL + WR) shows ~1% higher cross-section than WL only
- Conclusion: WL production dominates across most parameter space (off-shell WR production less favorable than chirality flip)
- Including tb channel increases cross-section by ~10% compared to standard approach
Decay width comparison (3 TeV WR):
-
generate t > q q b / w+: Width = 1.1 × 10^{-8} ± 1.4 × 10^{-11} GeV -
generate t > q q b / wr+: Width = 0.97 ± 0.0007 GeV - Result: WR decay channel negligible at high masses
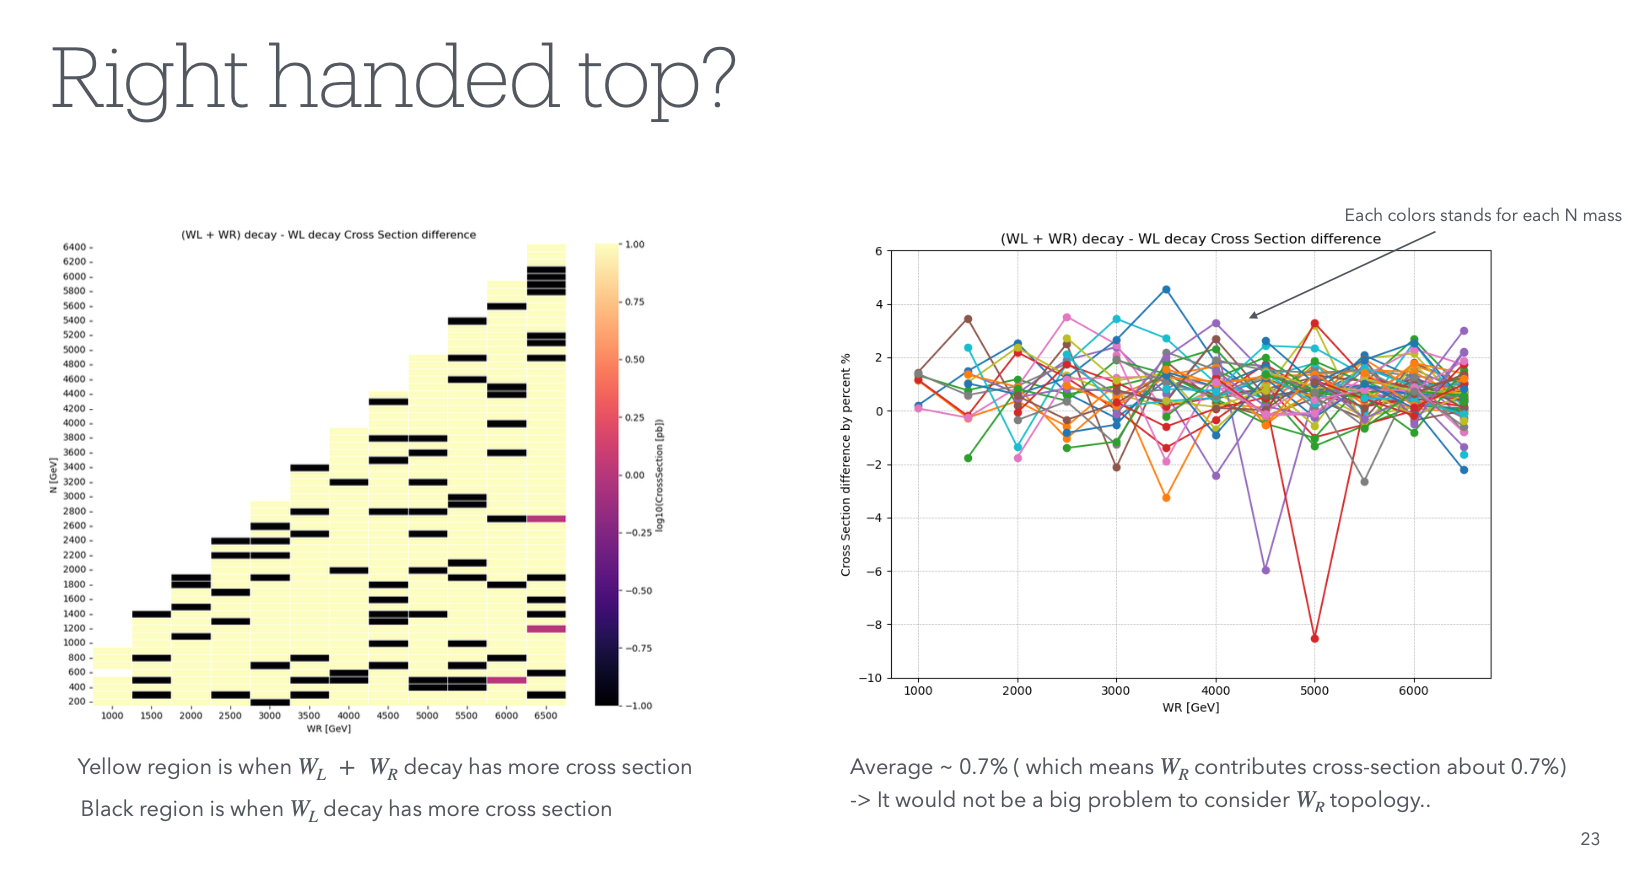
Checked with WL + WR both decay mode and the case with decays with only SM W. There was no significance pattern when does WR contributes to cross section.
Yellow region means when WL + WR decays it has more cross section and it was order of less than 5% in LO. Also black region is when WL + WR makes less cross section and DONT KNOW WHY yet why this happens, also in LO.
1.6 Cross-Section Studies
Cross section is checked with LO gridpacks.
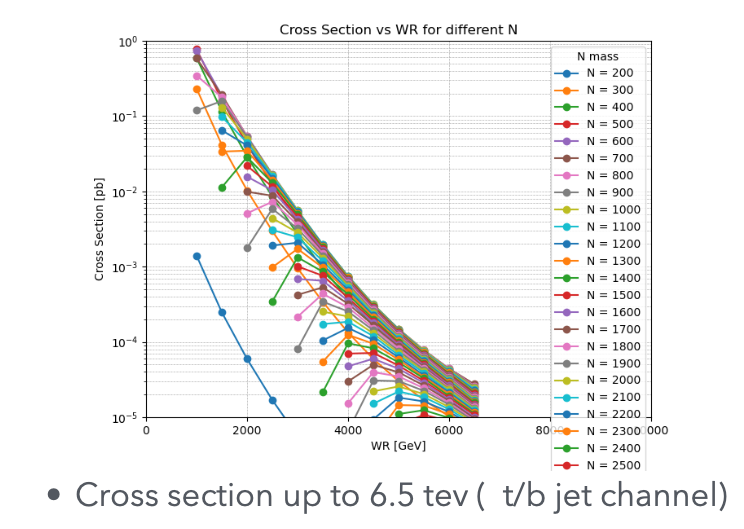
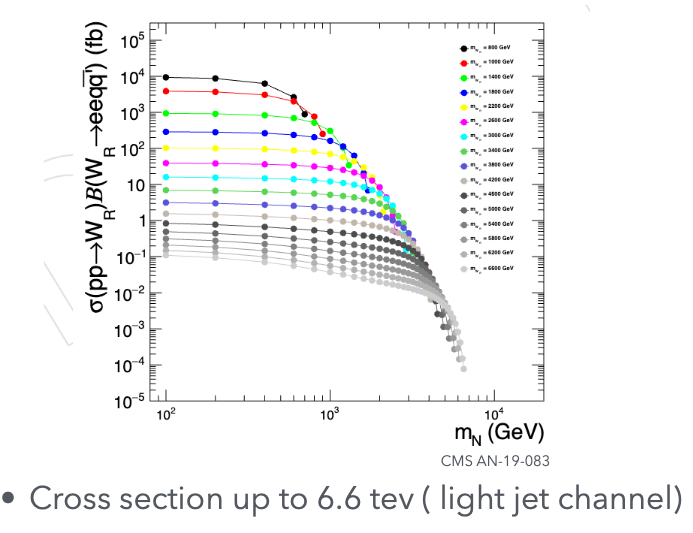
- Cross section can be differ 3 order Cross sections for exo 20-002
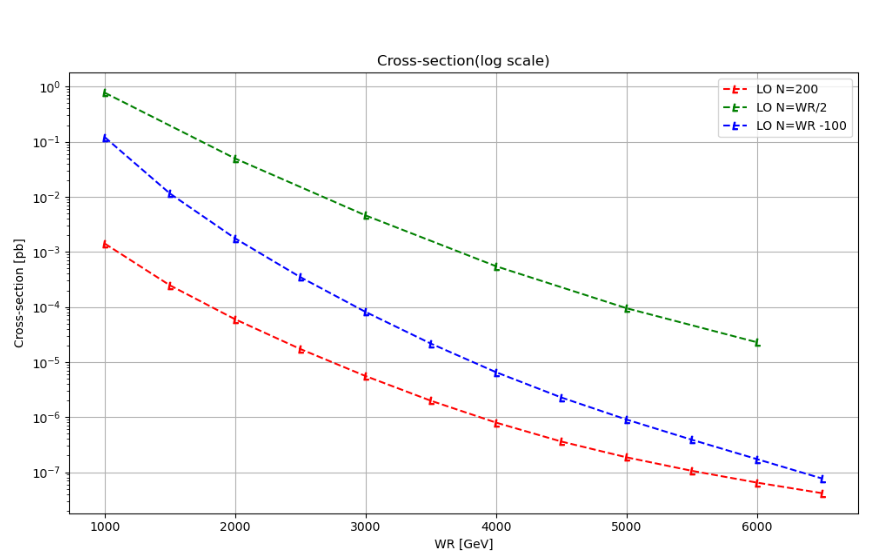
Cross section when N is ~ WR/2 has the most cross section, because N = 200 it is constraint due to top mass, and also N ~ WR has no much kinematic phase space to decay.
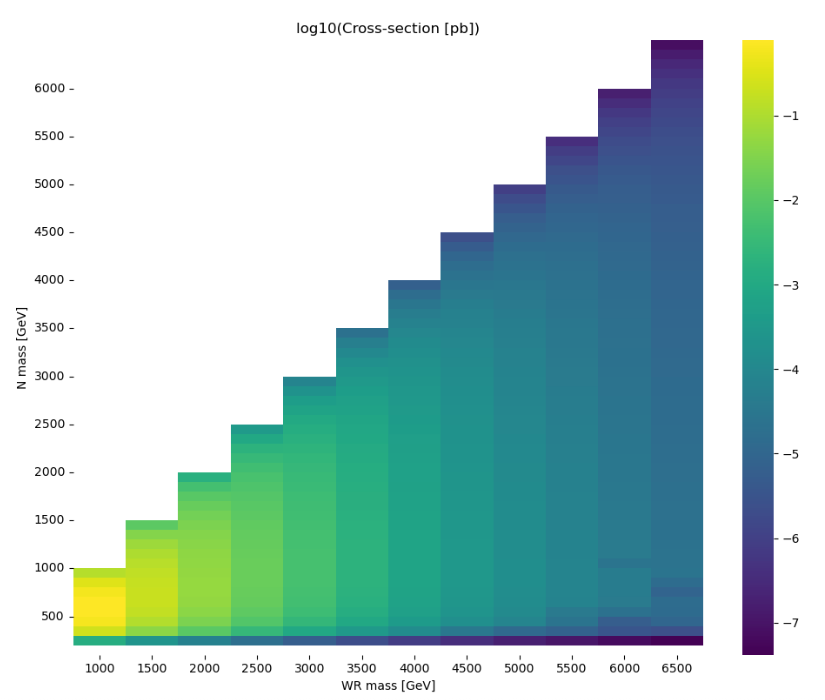
Full cross section
-> Detailed cross section has to be checked in madgraph card setting and for kinematics , madspin would be used. For details in card setting , does channel for e/mu creation should open other lepton flavor and just using one flavor or closing other flavor and using one flavor , which one is right is not figured out yet . Also needs NLO , to get K factors .
- Leptonic decay for WR* First checked tb top to (wl b) , WL to leptonic channel , which has ratio of 10 less than hadronic channel . so ud sc has more than ratio of 10 with single lepton channel .
SM has
2. Signal Analysis
2.1 Kinematics and Event Topology
Analysis approach: Event kinematics studied using LHE files (parton level) to understand ΔR and pT distributions.
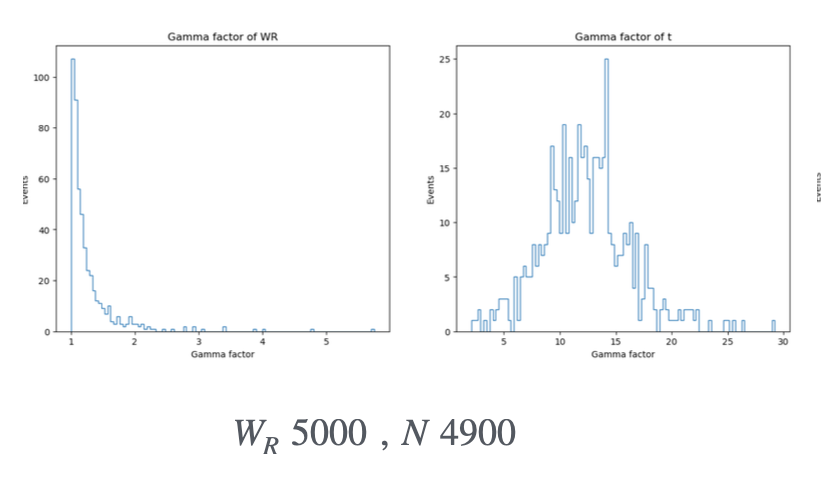
Boost Factors for non observable objects (WR, top)

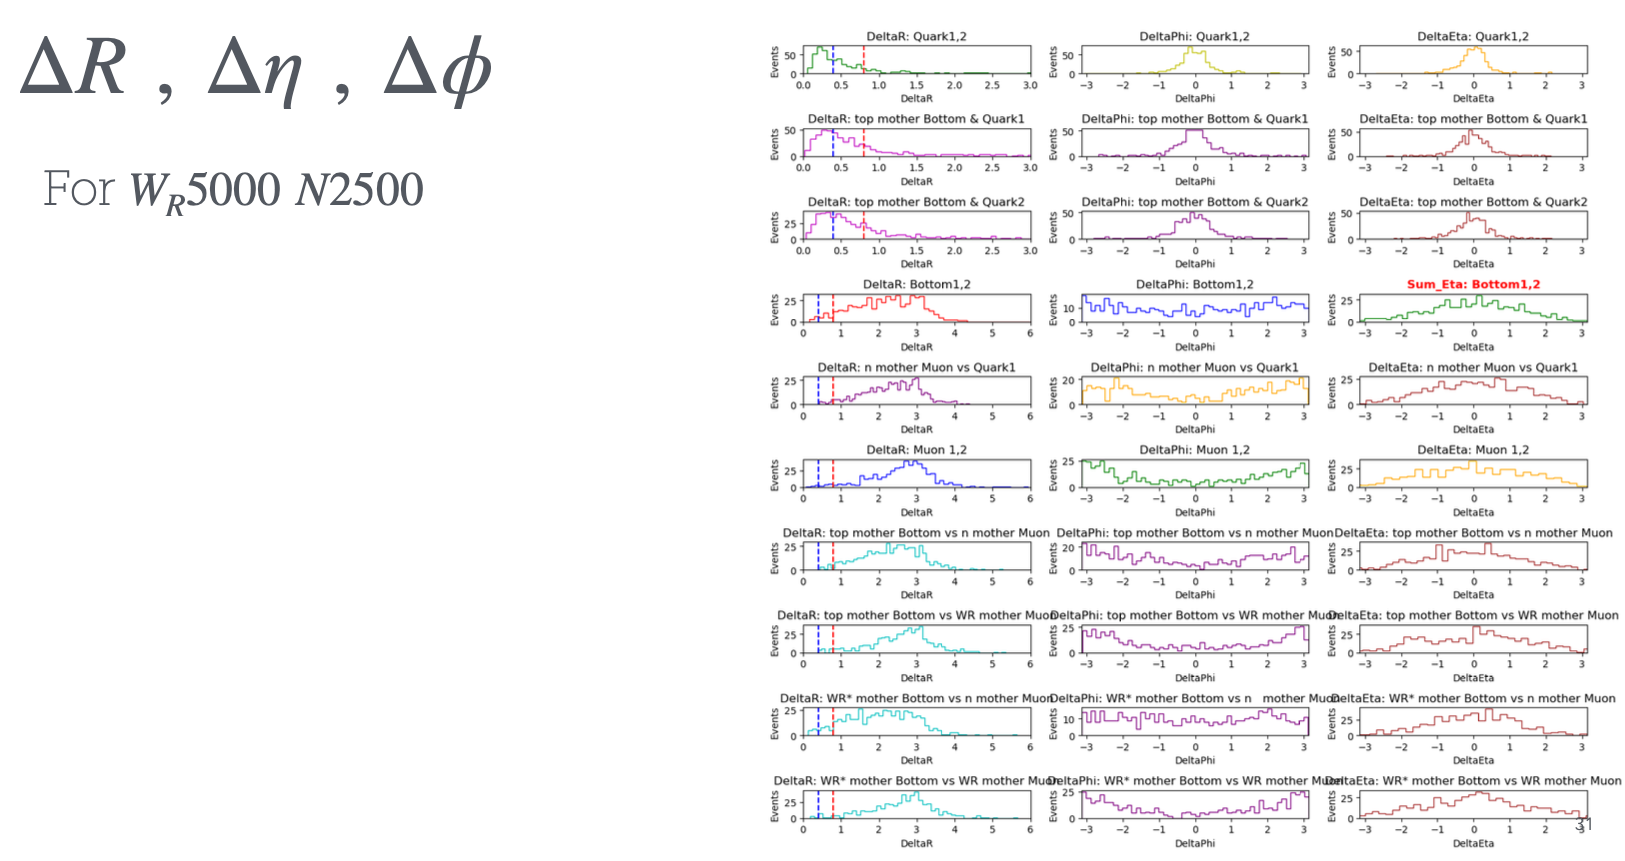
Delta R, Delta eta, Delta phi for each variables
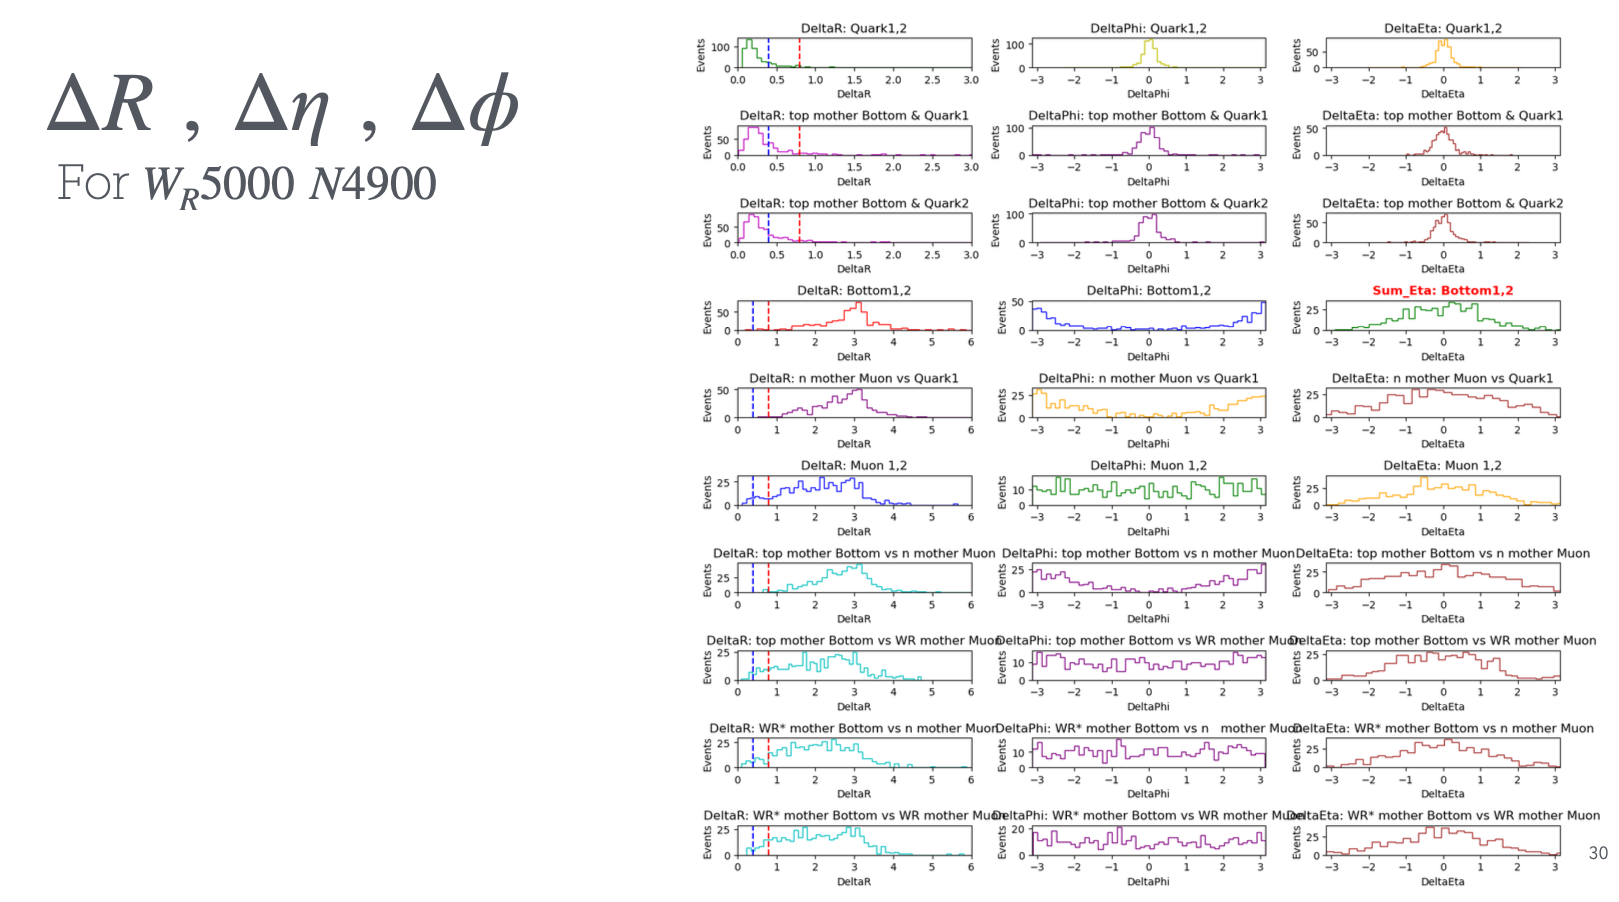
2.1.1 WR ~ N Mass Region (5000, 4900 GeV)
Key observations:
- WR* rest frame: t and b quarks produced back-to-back (ΔR between bottom quarks ~3)
- Limited boost: Since WR* not highly boosted, tb quarks separate significantly
-
Lepton correlations:
- l1 (from WR): Can appear in all directions
- l2 (from N): Back-to-back with WR* in N rest frame
- Unexpected behavior: Top quark less boosted than expected, follows WR* direction
- Bottom quark: Highly boosted, random direction relative to l2
- Interpretation: Suggests moderate WR* boost regime
2.1.2 WR ~ N/2 Mass Region (5000, 2500 GeV)
Distinct topology observed:
- Initial state: N and l1 produced back-to-back, with N significantly boosted
-
N decay dynamics:
- l2 partially opposes N boost → moderate displacement from WR* direction
- Some l2 events still follow WR* direction due to boost competition
- WR* behavior: Inherits N direction due to boost inheritance
-
Final state tb decay:
- b quark: Receives strong additional boost → significant separation from top jet
- Top jet: Moderately boosted (reduced WR* mass) → partially follows N direction
-
Angular correlation: b quark direction depends on decay orientation:
- Opposite WR* direction → back-to-back with system
- Same WR* direction → collinear with top jet
2.2 AK8 Top Jet Analysis
Primary objective: Identify and characterize signal AK8 jets while understanding potential backgrounds and misidentification sources.
Analysis strategy:
- Signal jet identification: Match closest AK8 jet to generator-level top quark
- Background characterization: Study distance distributions and top scores for nearby AK8 jets
- Selection validation: Test discriminating power of top tagger and soft-drop mass cuts
- Efficiency assessment: Evaluate performance with randomized AK8 jet selection
2.2.1 Signal Efficiency and Fake Jet Studies
Objective: Assess signal efficiency by identifying potential fake signals that mimic top jets.
Methodology:
- Geometric matching: Examine ΔR between post-FSR generator-level top quarks and reconstructed AK8 jets
- Discriminant analysis: Evaluate soft-drop mass and top tagger scores for nearby AK8 jets to assess misidentification probability
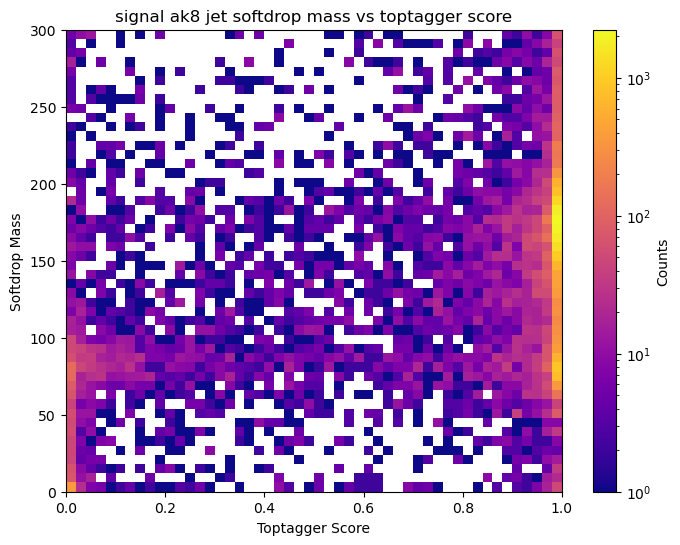
Results for WR = 5000, MN = 4900 GeV:
Key findings:
- Clean separation: No overlap with other fat jets in signal region
- Low-mass artifacts: Missing entries at low soft-drop mass due to poor jet reconstruction
- B-jet leakage signature: Soft-drop mass range 80-150 GeV corresponds to top jets missing b-quarks
- Mass dependence: WR~N/2 shows more b-quark leakage than WR~N due to reduced WR* boost → less collimated decay products
2.2.2 Signal Selection Efficiency
Overall performance assessment: Application of top tagger and soft-drop mass cuts to complete signal sample
Efficiency results: 499/500 events (99.8%) successfully identify signal top quarks with AK8 jets
Mass point comparisons:
WR = 5000, MN = 4900 GeV:
2.2.3 Fake Jet Background Assessment
Random AK8 selection test: Evaluate false positive rate when applying top tagging and soft-drop mass cuts to arbitrary AK8 jets
Key findings:
- Primary signal identification: Closest ΔR match reliably identifies true signal
- Secondary contamination: Some jets within ΔR < 0.8 pass selection cuts
2.2.4 Fake AK8 Jet Classification
Event categories: No events with 3+ top-tagged jets observed
Classification scheme:
- Single AK8: One jet passes selection
- Double AK8: Two jets pass selection
Analysis for WR = 5000, MN = 4900 GeV
Double AK8 scenarios:
- 2S (two signal): Not possible → no additional AK8 jets within ΔR < 0.8 of signal
-
Event classification:
- 1F1S: One jet within ΔR < 0.8 + one jet outside ΔR > 0.8 pass cuts
- 2F: Closest jet fails cuts + two jets outside ΔR > 0.8 pass cuts
| Event Type | 2F (two fake) | 1F1S (one fake + signal) |
|---|---|---|
| 2 AK8 jets | Low rate | Moderate rate |
Single AK8 scenarios:
| Event Type | 1F (one fake) | 1S (signal only) |
|---|---|---|
| 1 AK8 jet | Low rate | Dominant |
Key observations:
- Single AK8 events: No issues, dominant contribution with clear signal identification
- Double AK8 events: Lower rate but challenging discrimination → top tagger shows limited separation, soft-drop mass distributions similar to genuine top jets
Angular Analysis and Interpretation
Hypothesis: Double AK8 events may result from b-quark/top-quark angular correlation creating secondary jets outside ΔR > 0.8
Investigation approach:
- LHE-level analysis: Study η, φ separations between b quarks from different sources
- Reconstructed jet correlations: Examine η, φ differences between AK8 jets and generator-level tops
- Mass correlation: High soft-drop masses potentially due to WR*→b contamination
- Back-to-back topology: Study large ΔR events with opposite φ values
Key questions:
- How often do WR* b quarks fall outside ΔR = 0.8 cone?
- What fraction of single AK8 events contain hidden b quarks?
- Are double AK8 events predominantly from b-quark leakage scenarios?
Conclusions from angular analysis:
- η difference/sum limitations: Near-zero values make it difficult to distinguish back-to-back vs collinear configurations
- Dominant pattern: Sum distribution peaks near 0, with very few events beyond 3 → confirms predominantly back-to-back topology
- Rare collinear cases: Small fraction shows same-direction propagation
- Fake jet mechanism: Collinear events likely create additional ΔR~0.8 cones from W-boson (from top) + b-quark (from WR*) combinations
- Event rate consistency: No more than 2 AK8 jets pass baseline cuts, consistent with this interpretation
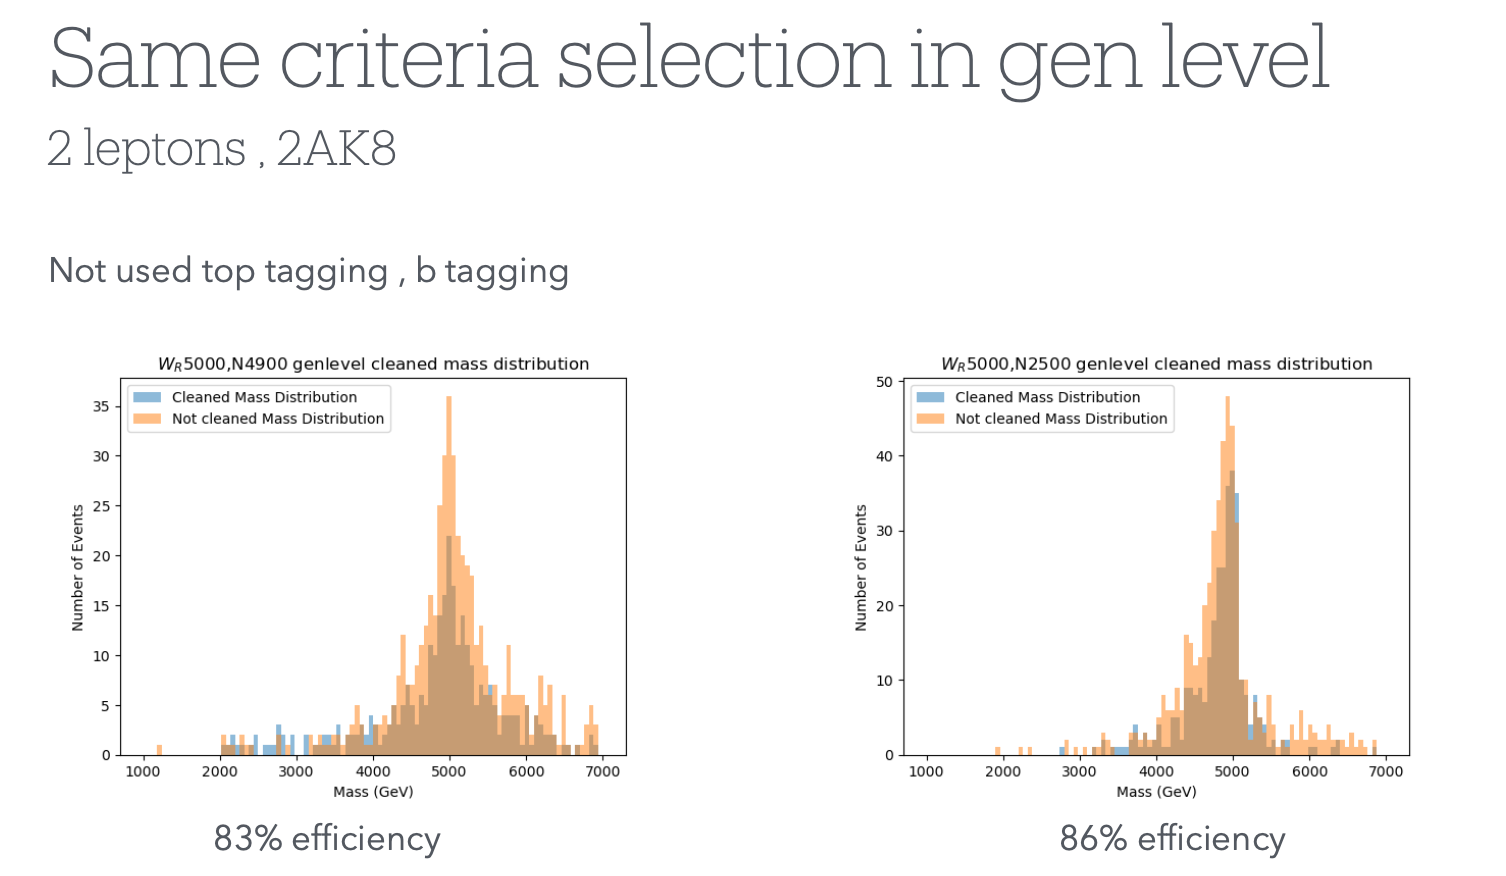
2.2.5 AK8 Jet Cleaning and Efficiency Losses
For cleaning strategy, it must not overlap with signal muons that is selected and should not be overlapped with other ak8 jets. Did not consider overlapping with ak4 because it also can be reco with AK4.
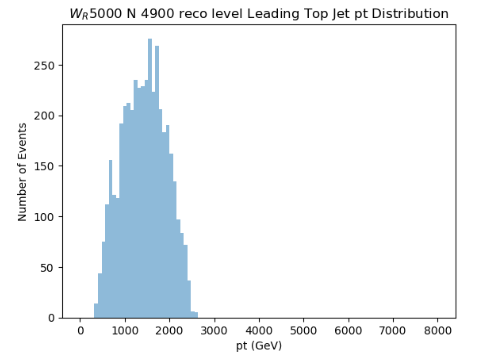
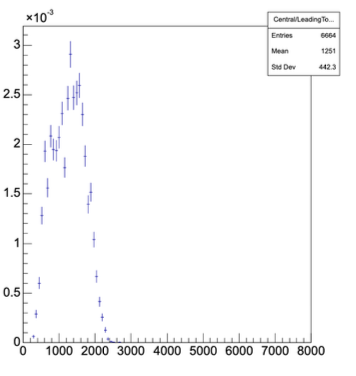
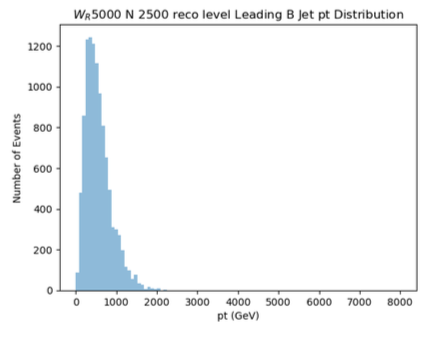
After cleaning, top pt:
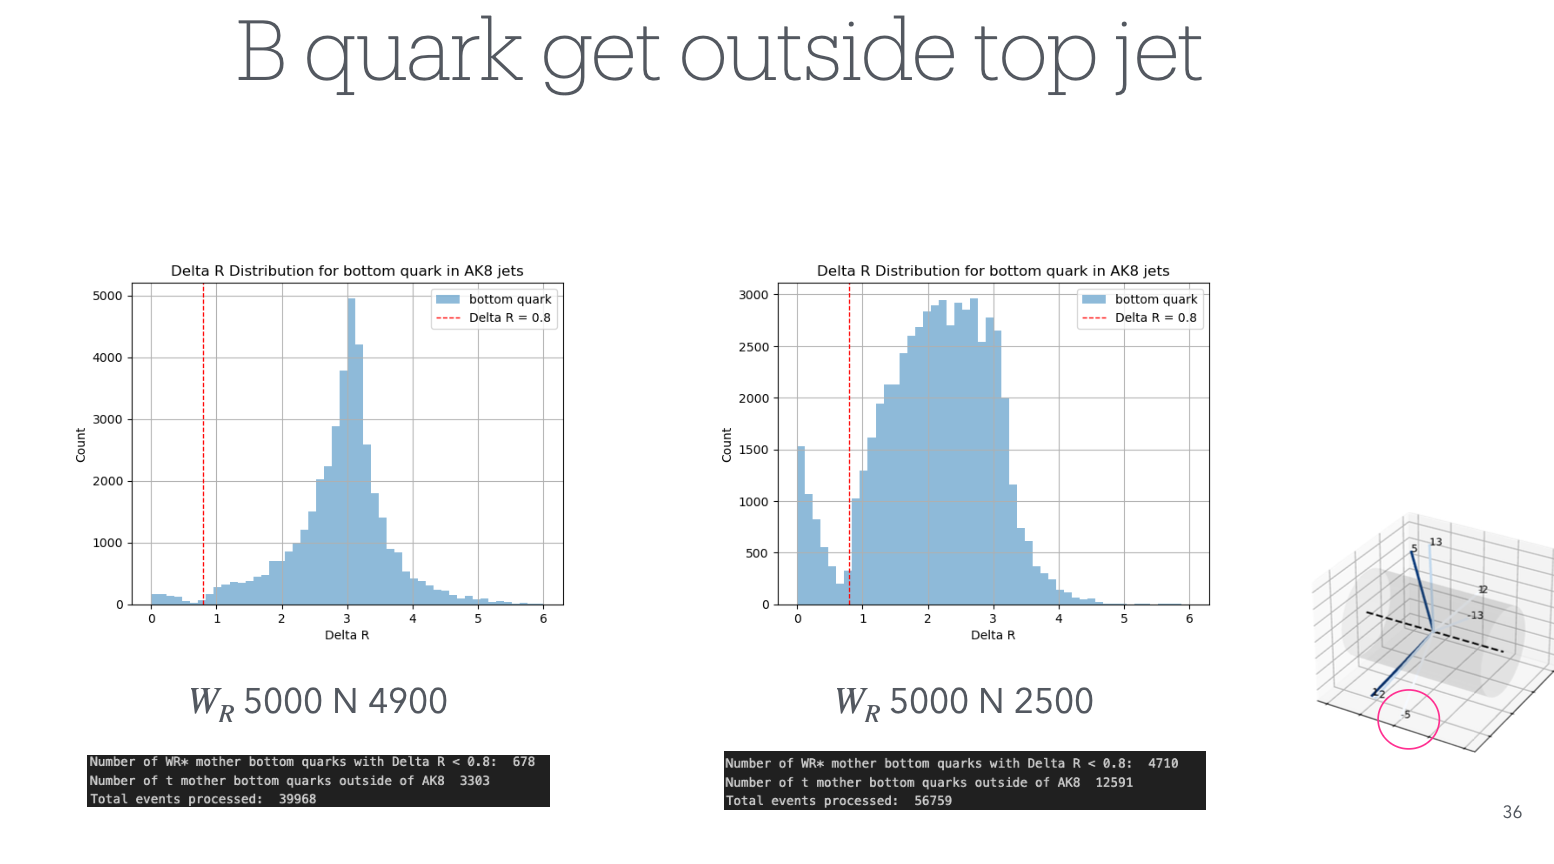
2.2.5.1 B-Jet Cross-Contamination Analysis
Issue: Back-to-back b-jets occasionally enter AK8 cones, though rate is relatively low
Method: Use LHE-level b-quarks to measure ΔR between signal b-jets and top jets for contamination assessment
Contamination rates:
WR = 5000, MN = 4900 GeV:
- WR* b-jets entering AK8: 678/39,968 jets (1.2%)
- Top b-jets escaping AK8: 3,303/39,968 jets (8.26%)
WR = 5000, MN = 2500 GeV:
- WR* b-jets entering AK8: 4,710/56,759 jets (8.3%)
- Top b-jets escaping AK8: 12,591/56,759 jets (22.18%)
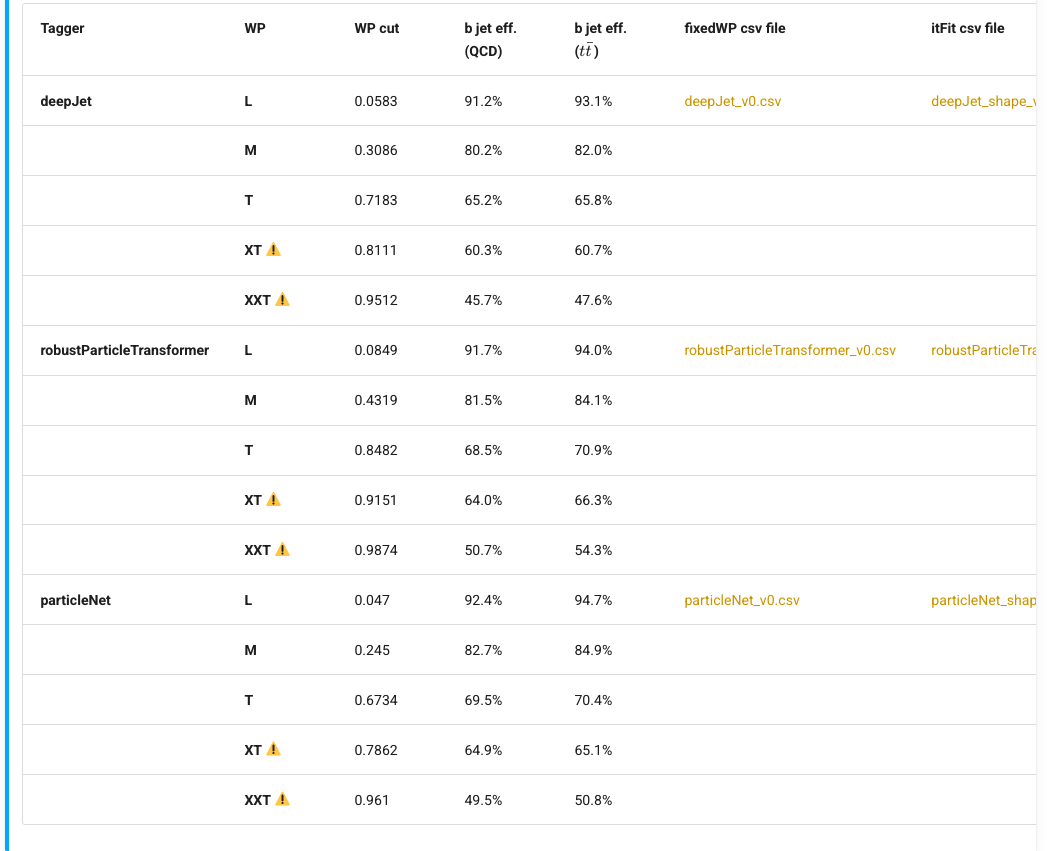
2.2.6 Top tagging recommendation after cleaning
Reference: CMS Top Tagging Working Points

There is a WP with variable tau3/tau2 but it has low eff than particle net so It should be waitten until WP came with version NanoAOD v 15
For working process:


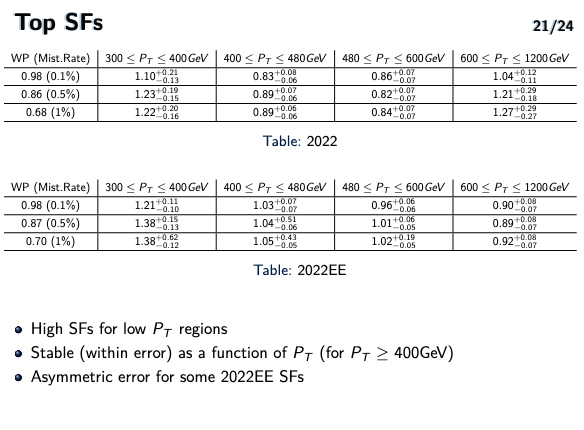
It might be better to use Loose WP due to high pt and for stable with error.
which this plot show when cut slight adjusted.
2.2.7 Conclusion
When two top jets are found: If the masses are similar and they are adjacent to each other, there’s no need to search for additional b-jets.
When only one top jet is present:
- Case where b escapes from t and WR b doesn’t enter: distinguishable by SDM
- Case where b escapes from t and WR b enters: very rare, need to review if kinematically possible
- Case where b doesn’t escape from t and WR b enters: AK8 mass should be very large
Summary of events to discard:
AK8 Jet:
- When top tagger 0.9, SDM 120 or higher are set as baseline (40% ~ 50%) → low soft drop mass cases, b escape cases
- When two AK8s appear (when b jet protrudes forward) (5%)
- When one AK8 appears
- Among these, when WR*b enters (1% ~ 8%)
→ For WR 5000 N 4900 case, probability of obtaining clean and accurate top signal: ~55% → For WR 5000 N 2500 case, probability of obtaining clean and accurate top signal: ~40%
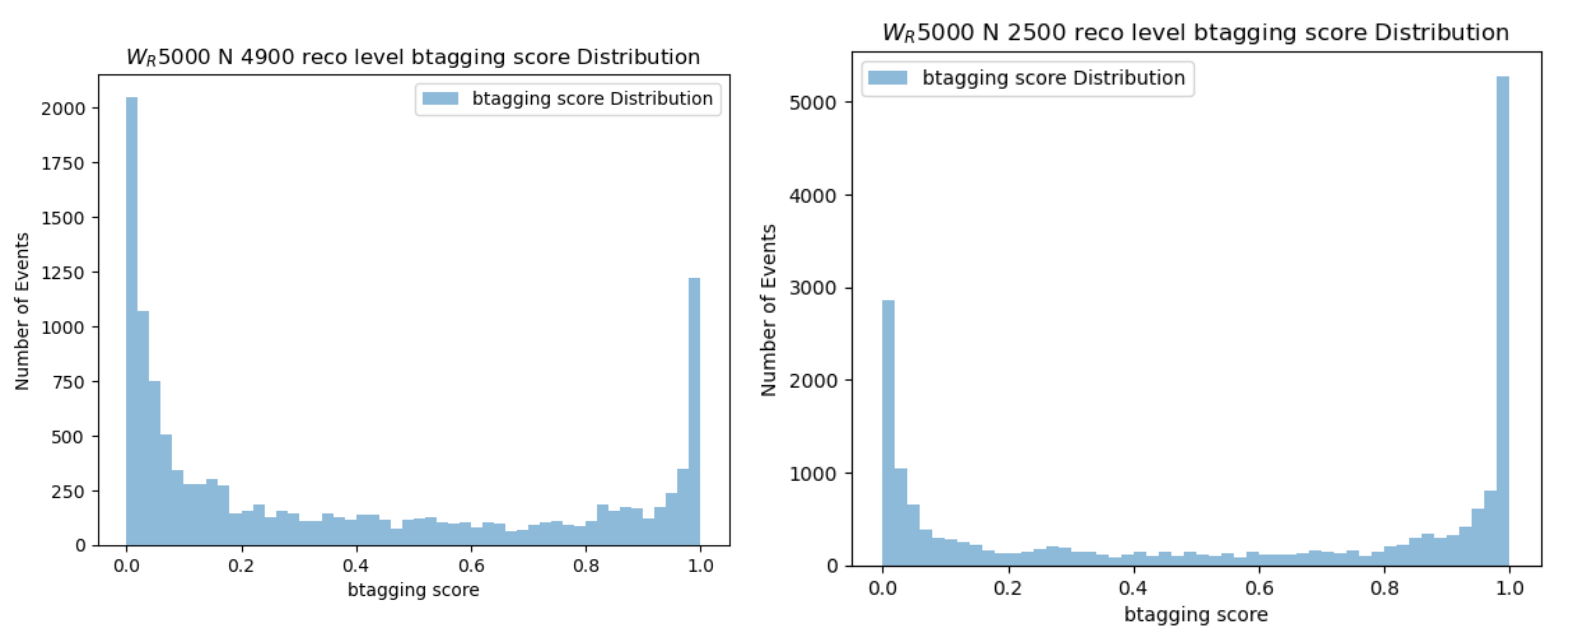
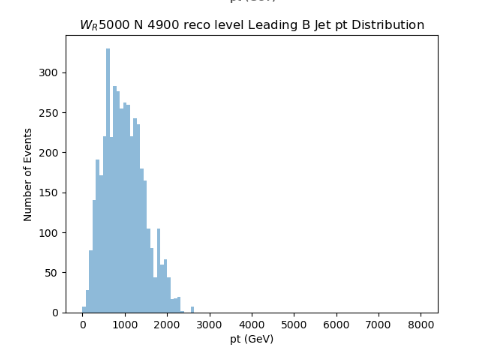
2.3 B-Jet Analysis
2.3.1 B-Jet Identification Efficiency
Objective: Identify signal b-jets from WR* decay without relying primarily on jet mass reconstruction
Task: Identify AK4 jets originating from signal b-quarks
Geometric Matching Algorithm
Truth matching procedure:
- Use LHE b-quarks as ground truth for signal b identification
- Find closest AK4 jet to each LHE b-quark using ΔR matching
Distance criteria observed:
- Primary matches: Closest AK4 typically within ΔR < 0.4 (majority of cases)
- Secondary jets: Second-closest jets predominantly fall outside ΔR > 0.4
- Matching reliability: LHE-to-closest-AK4 matching appears robust for signal identification
Performance Validation Studies
B-tagging algorithm comparison (AK4 + AK8 + 2 leptons):
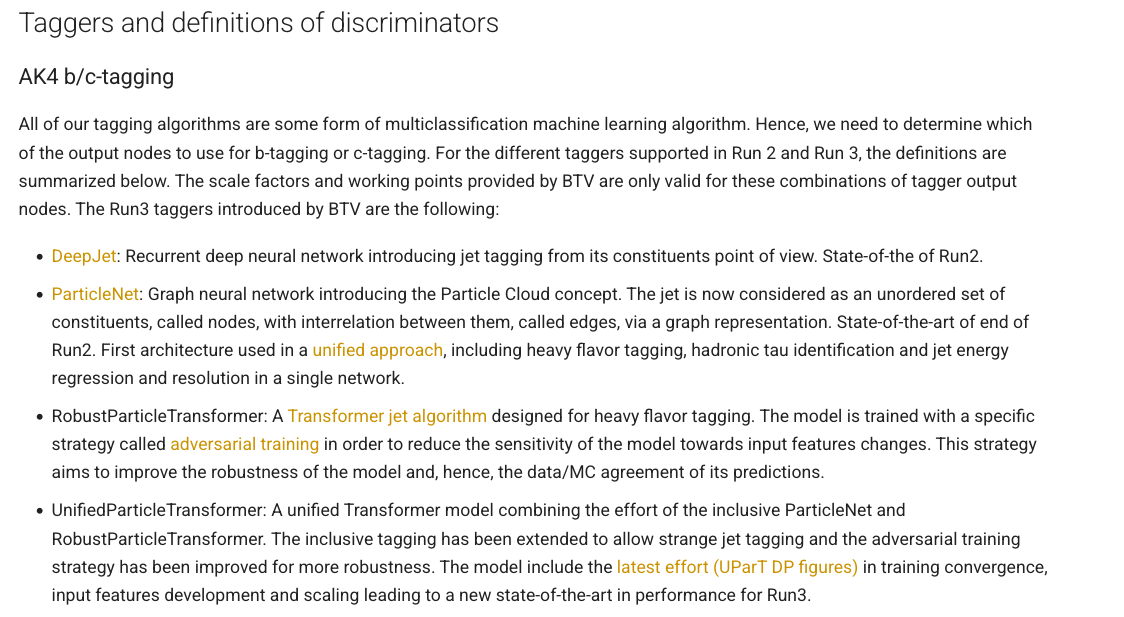
DeepJet algorithm [2022, Tight, 0.7183]:
- Efficiency: 8.195% → 8.08% after HLT_IsoMu30 trigger
ParticleNet algorithm [2022, Tight, 0.6734]:
- Efficiency: 8.63% → 8.465% after HLT_IsoMu30 trigger
Combined selection efficiency (2 AK8 + 2 leptons):
- Overall efficiency: 26.9% → 26.375% after HLT_IsoMu30 trigger
2.3.2 After cleaning
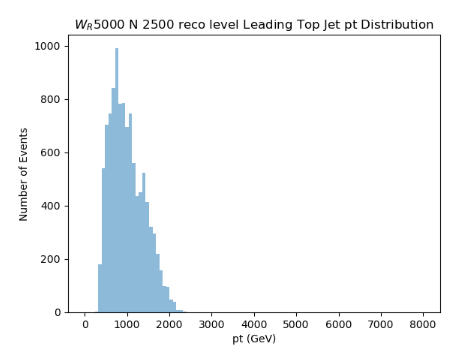
2.3.3 WR Mass Reconstruction Studies
Reconstruction scenarios tested for WR = 5000, MN = 2500 GeV:
 It is for another scenario bur it is quite well matched shape , which means it is well selected not choosing fake from signal sample.
When N is slightly boosted , N has less power to boost t , b which makes top slow and w ,b got outside of top jets.
2.3.4 B jet selection
For working point in 2022 ,
jet was selected with pt > 30 , eta < 2.5 , tight ID

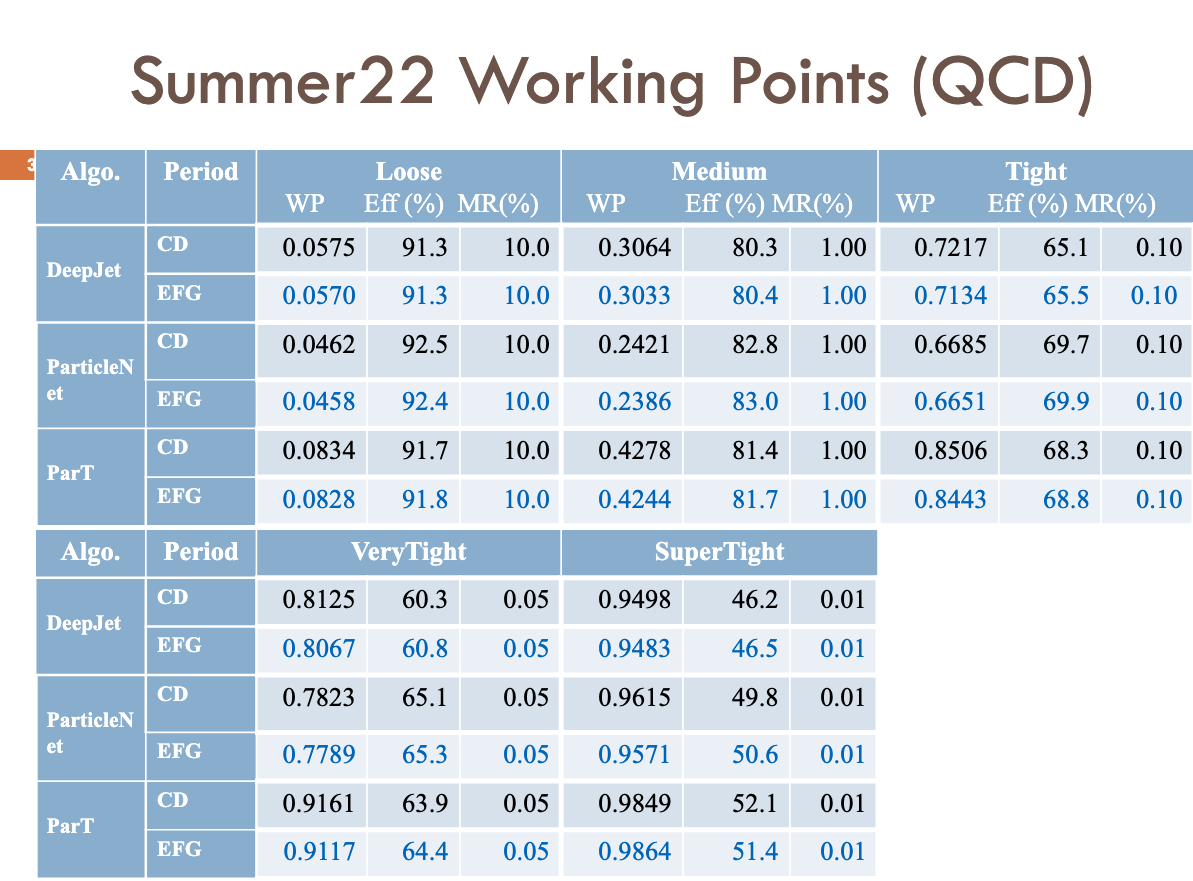
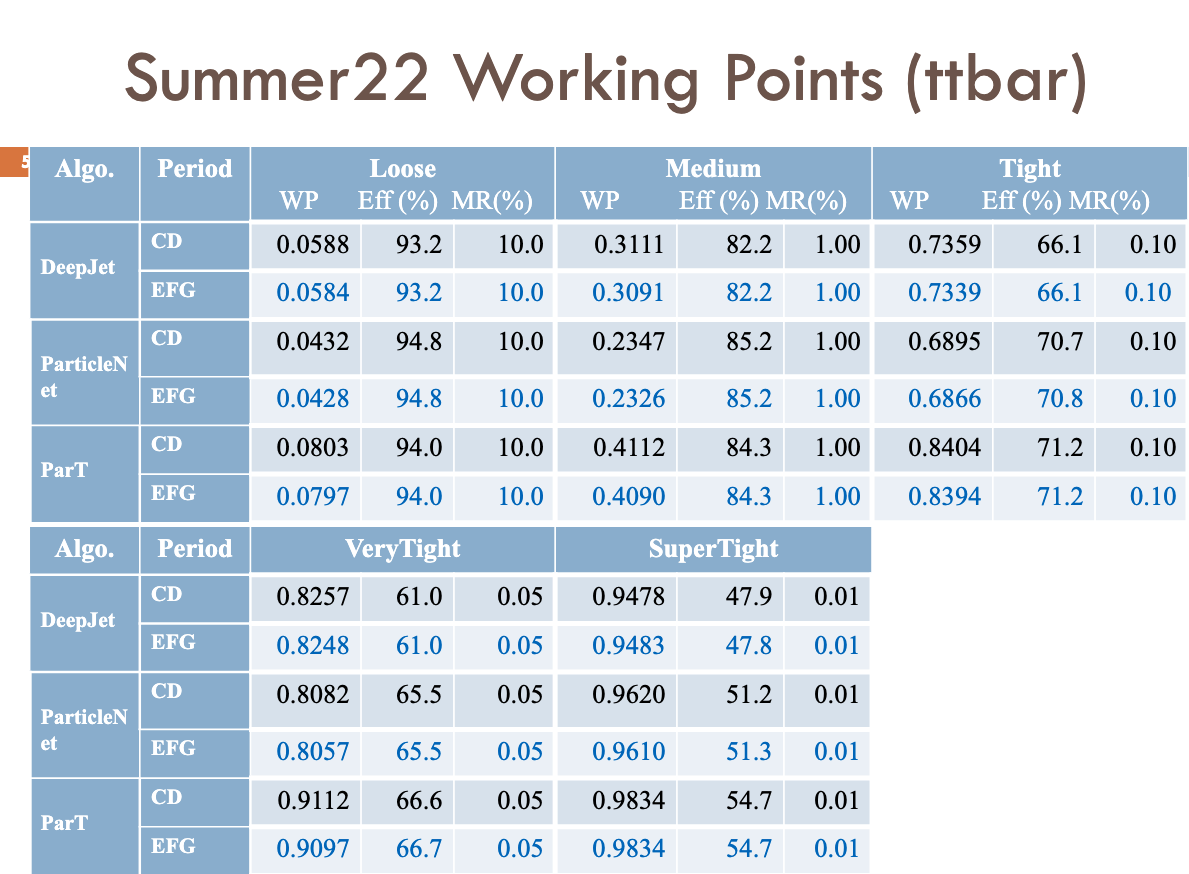
Choosed particle Net which is the most best score and tight . also pt > 30 , eta < 2.5.
2.4 Lepton Analysis
2.4.1 Muon features
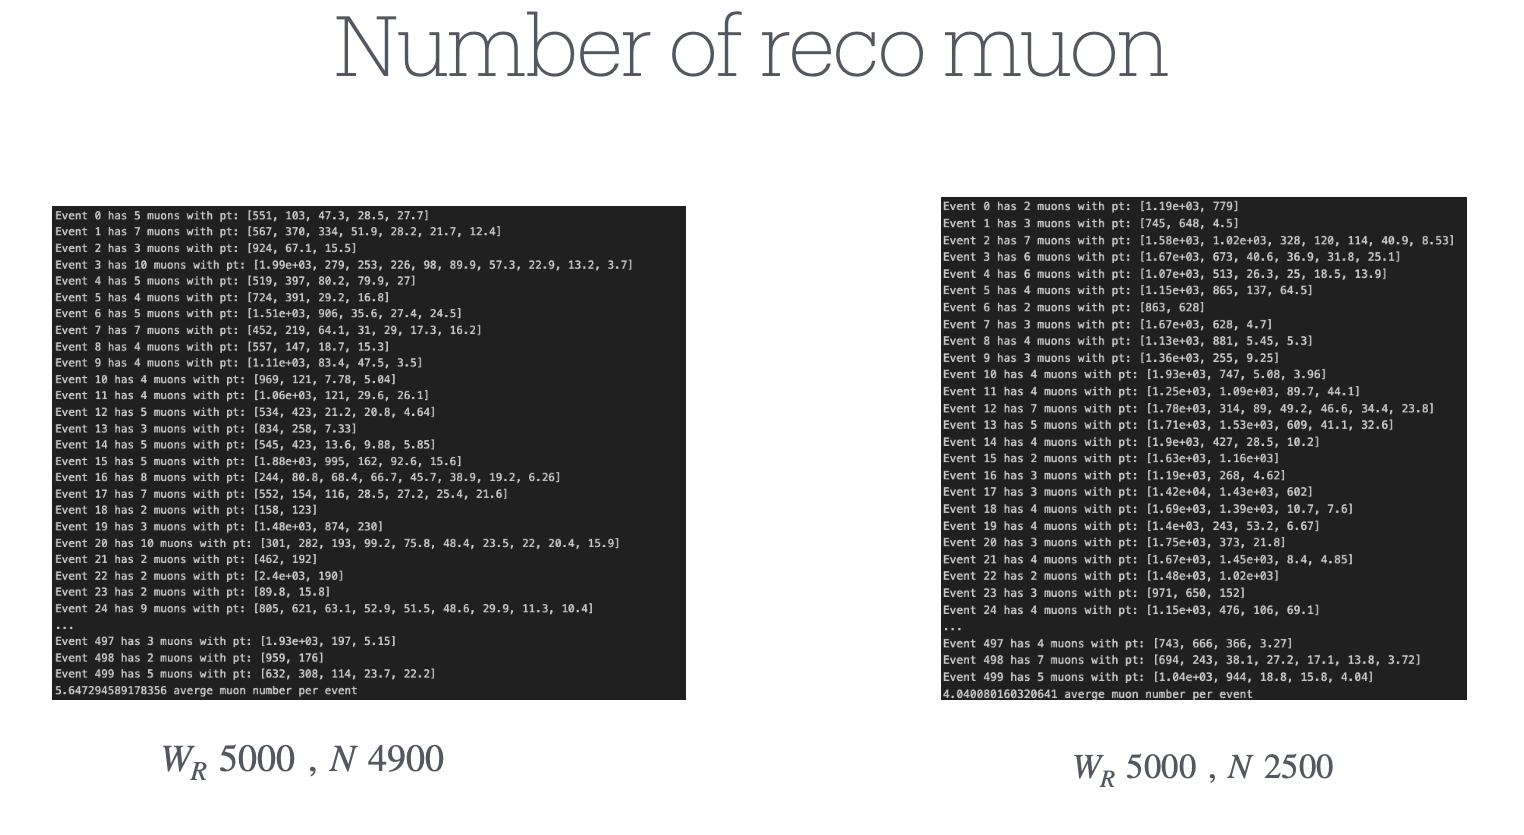
- Number of reco muon by mass points
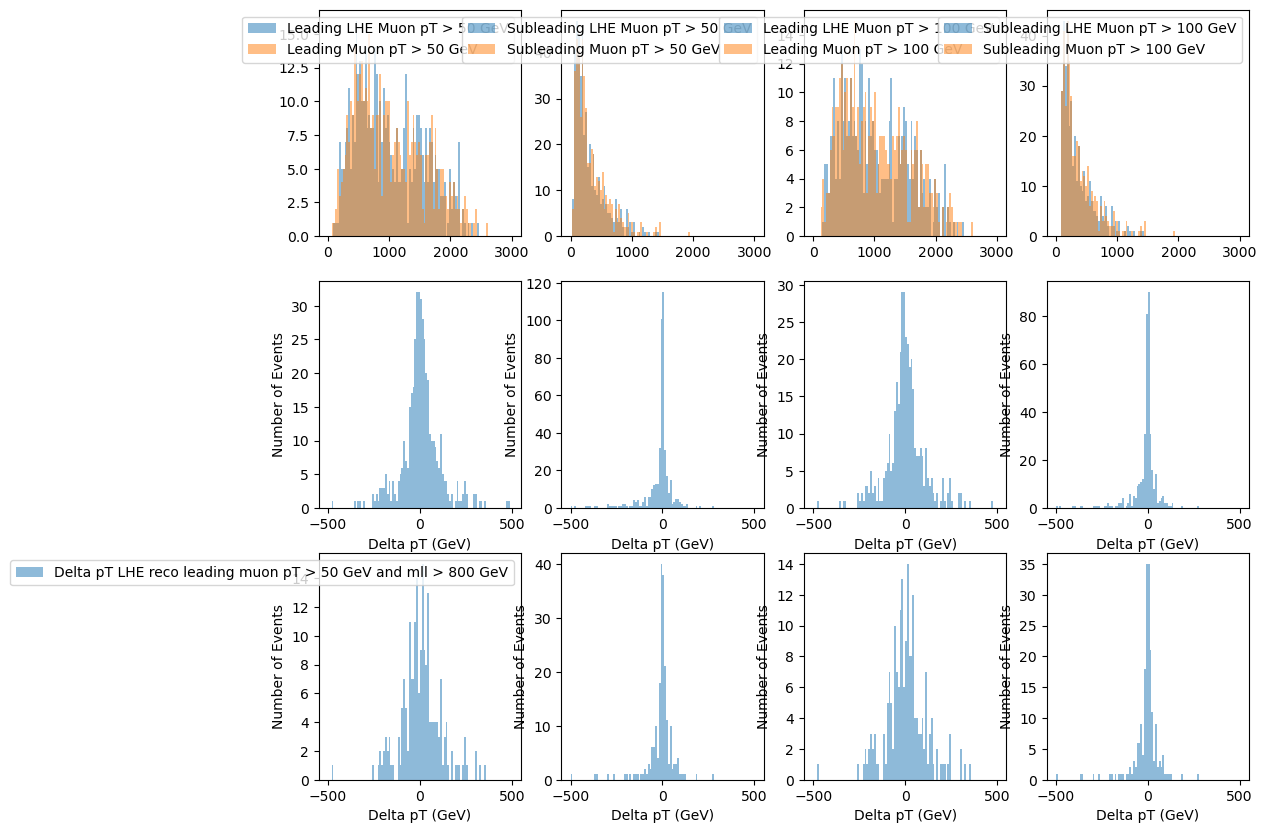
- Checking if the leading and subleading muon is same with lhe muons.
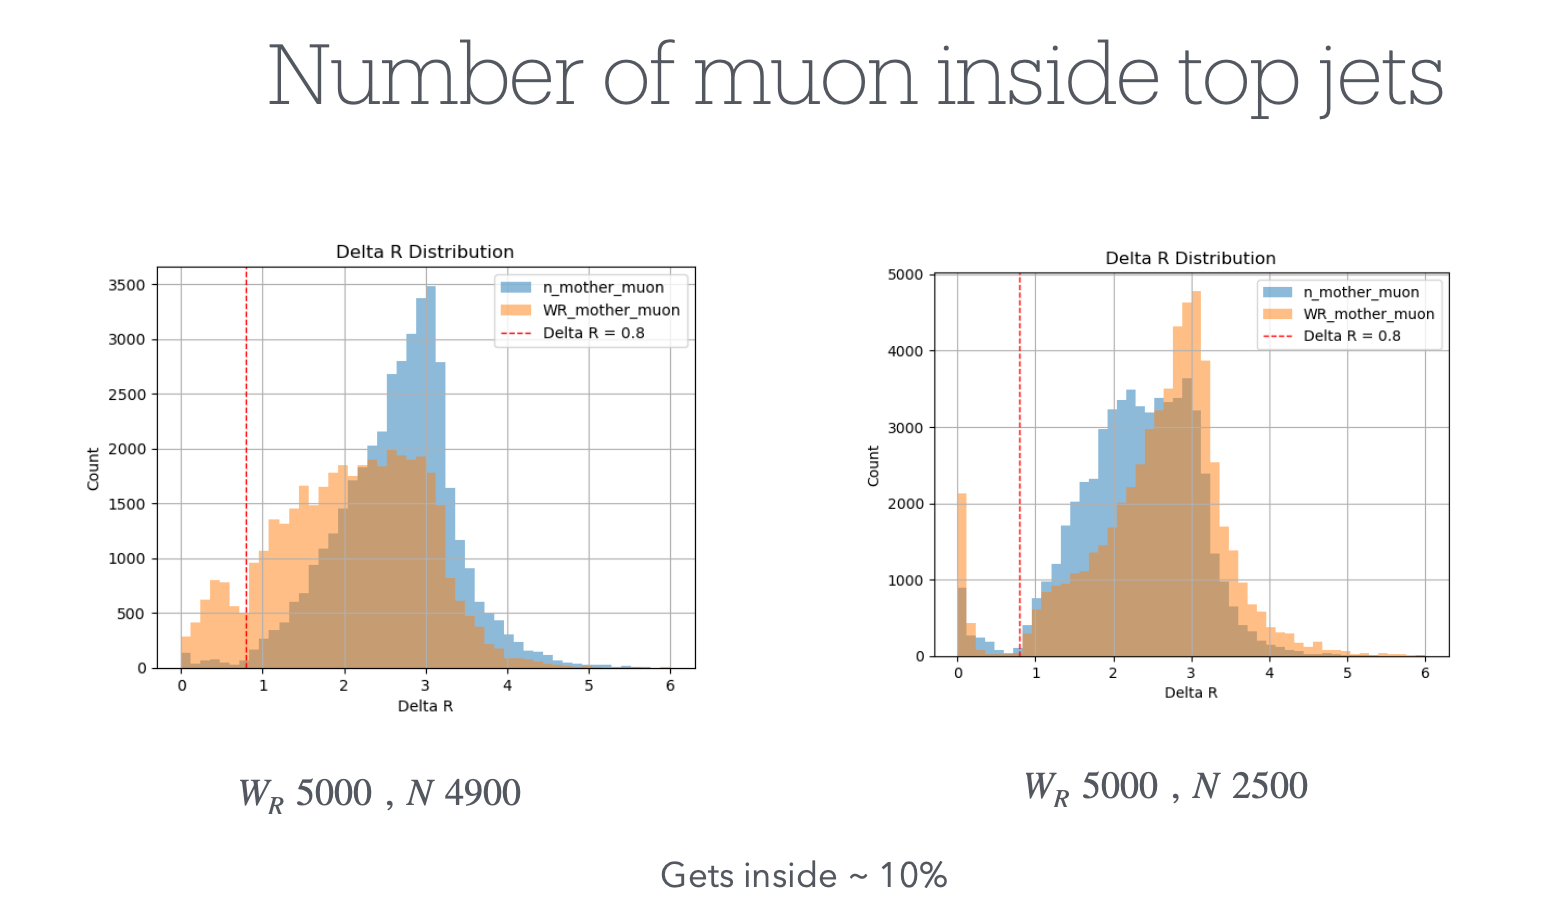
- Checking how much muon get inside top jet , which will make loss of signal .
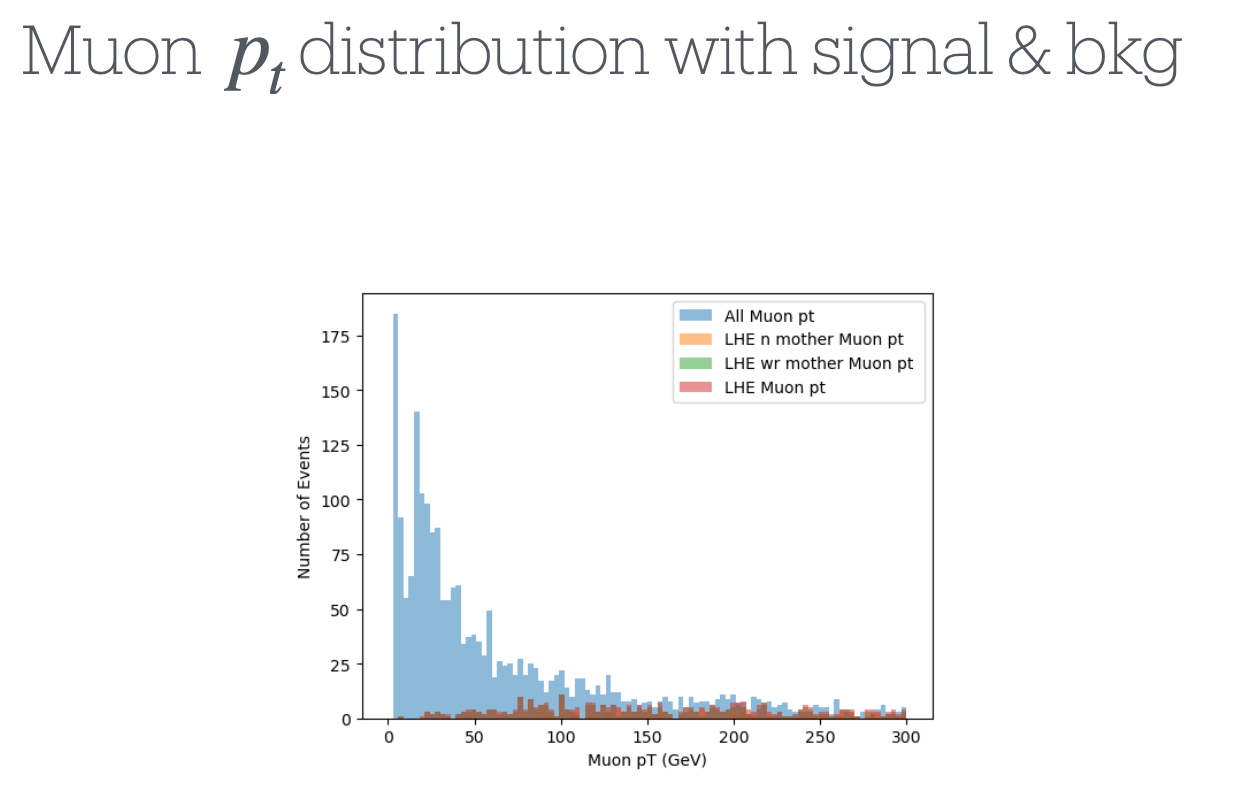
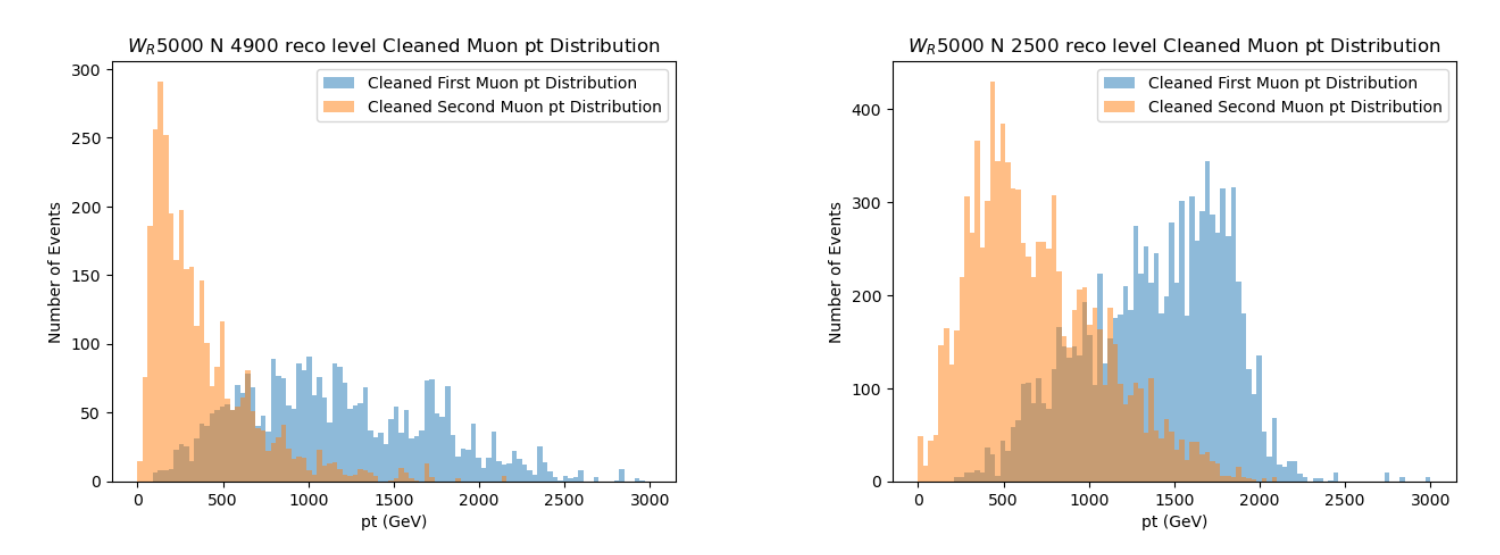
- Checking all of reco muon and signal muon pt , to get safe pt cut from getting fake muon while using leading , subleading muon .
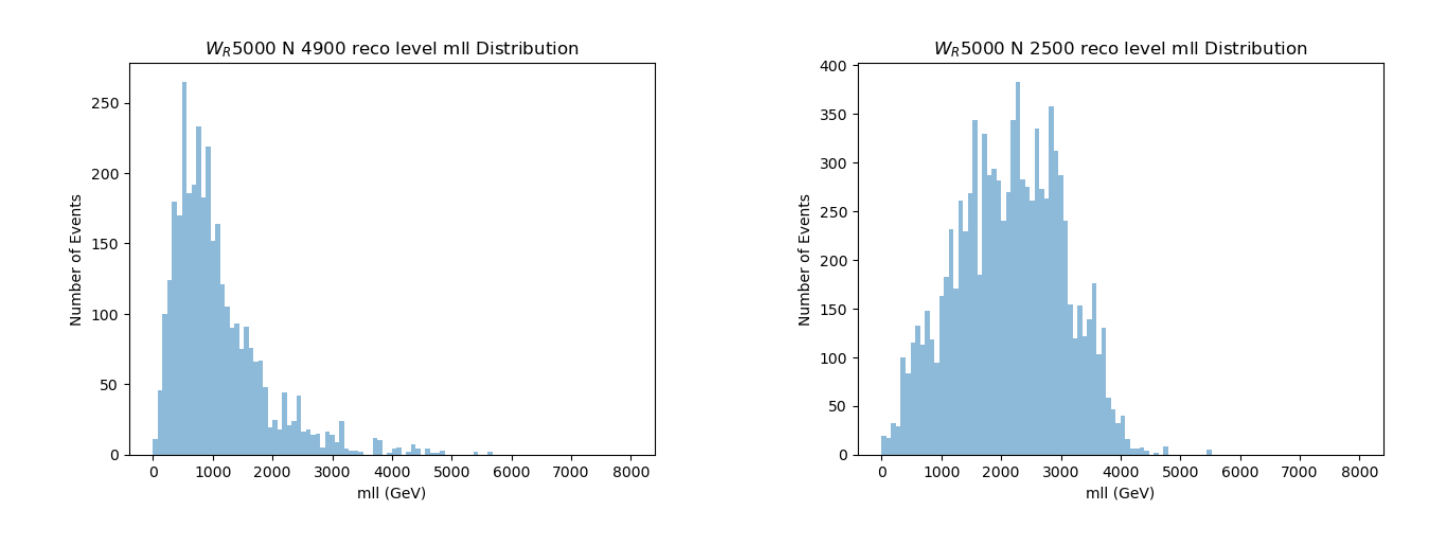
- Checking Mll to get advantage to seperate background .
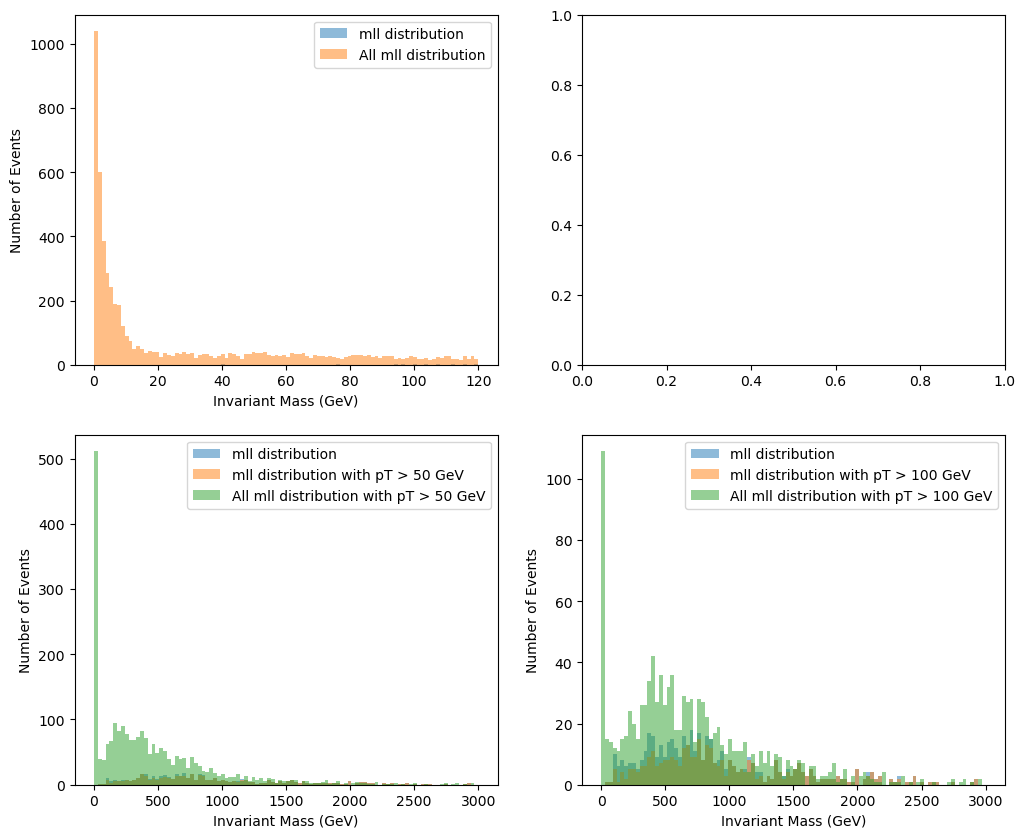
- Also checked mll and pt cut to make sure how much pt would seperate well from fake muon .
2.4.2 Lepton cleaning
Cases where they entered this ak8 (b jet overlap cases were not many in 5000 4900): → It seems we can use leptons from lhe and use the found fatjet.
WR 5000 N2500: survived jet: 52313 // cleaned jet: 4410 // total jet: 56723 @ On average, 4 muons are contained.
WR 5000 N 4900: survived jet: 36003 // cleaned jet: 3953 // total jet: 39956 @ On average, 6.5 muons are contained.
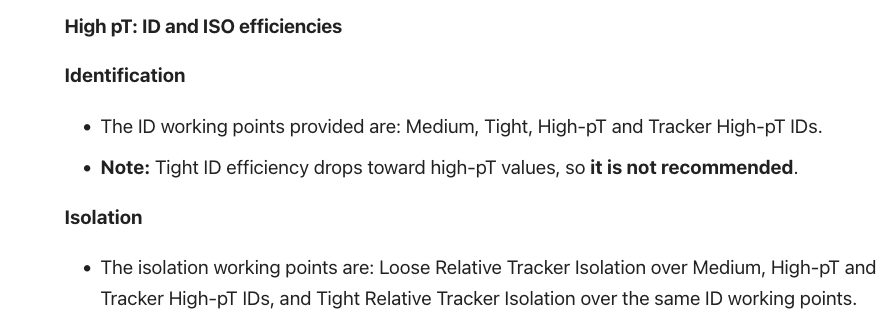
2.4.3 Lepton ID, Trigger selection
To get Leptons, first it should go through HLT, and we should choose leptons with ID.
For Muon, checking features first:
1. pt
2. High pt id and isolated
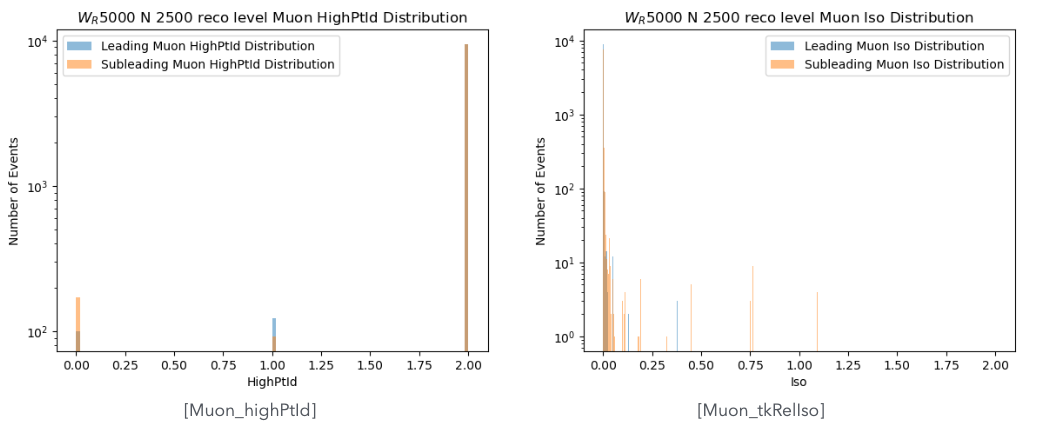
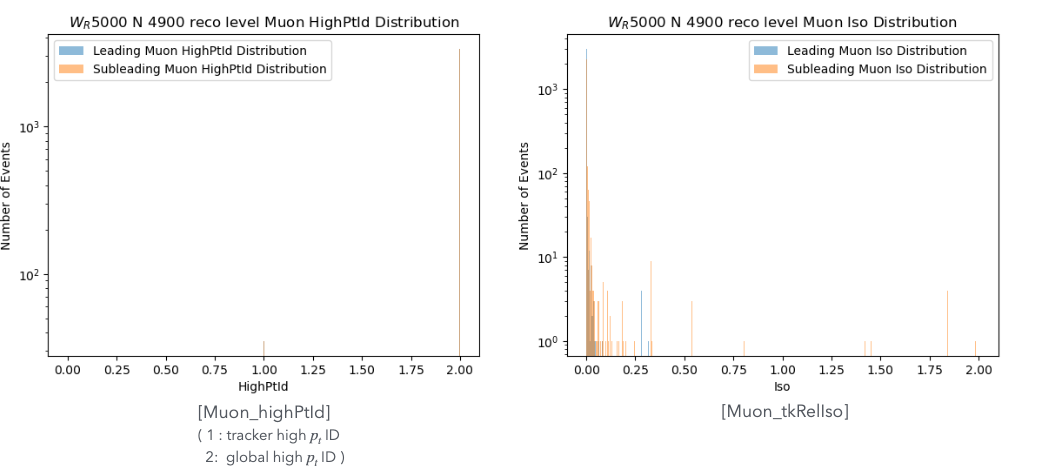
which mean we can use high pt id, and iso id, must also check recommendation.
HLT recommendation gives:

And for ID’s:
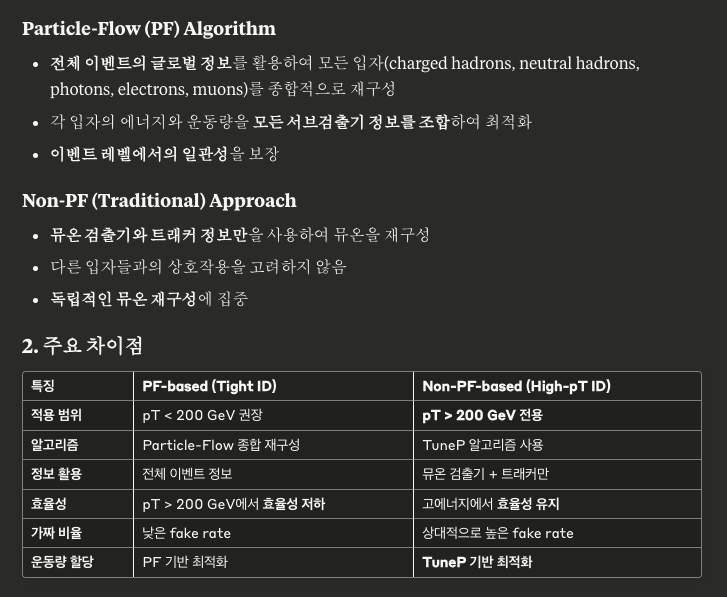
Conclusion: For muon selection, use:
-
HLT: HLT_Mu50 HLT_HighPtTkMu100 - ID: HighptID == 2 (tight), Muon_tkIsoId == 2 (tight)
- pT cut: starts from 50 GeV for SF availability
3. Background Analysis
3.1 Selection
3.1.1 v1
Selection cuts comparison:
| Cut | HLT | lead Muon pt | sub lead muon pt | Bjet | B pt | Top score | Top SDM | Top pt | WR mass | m(ll) |
|---|---|---|---|---|---|---|---|---|---|---|
| cut1 | ISOMU30 |
|
0 | Tight | 30 | 0.9 | 120 250 | 0 | 2000 | 300 |
| cut2 | ISOMU30 |
|
0 | Tight | 300 | 0.9 | 120 250 | 500 | 2000 | 300 |
cut1: BKG → TTHtononbb, TTLJ, TTTT, TTWtonu, TTZ, TZq
cut2: BKG → ST_TW_antitop_Semilep, ST_tW_top_Semilep, TTG_PTG200toinf, TTHToNonbb, TTLJ, TTTT, TTWtoNu, TTZ_M4to50, TTZ_M50, TTZ_NoFullyHad
Issues with these cuts:
- Muon trigger is not a recommended one, also it is isolated and high pt, which can use other HLT
- No Muon ID selected, also pt cut must be chosen with Muon ID min pt
- For cut2 B pt is too high to adjust scale factors. It should have some pt to measure scale factor which we can observe in data
- Also mll cut or wr mass cut gives large constraints of background, which makes it not available to measure SF which is the discrepancy of data and signal
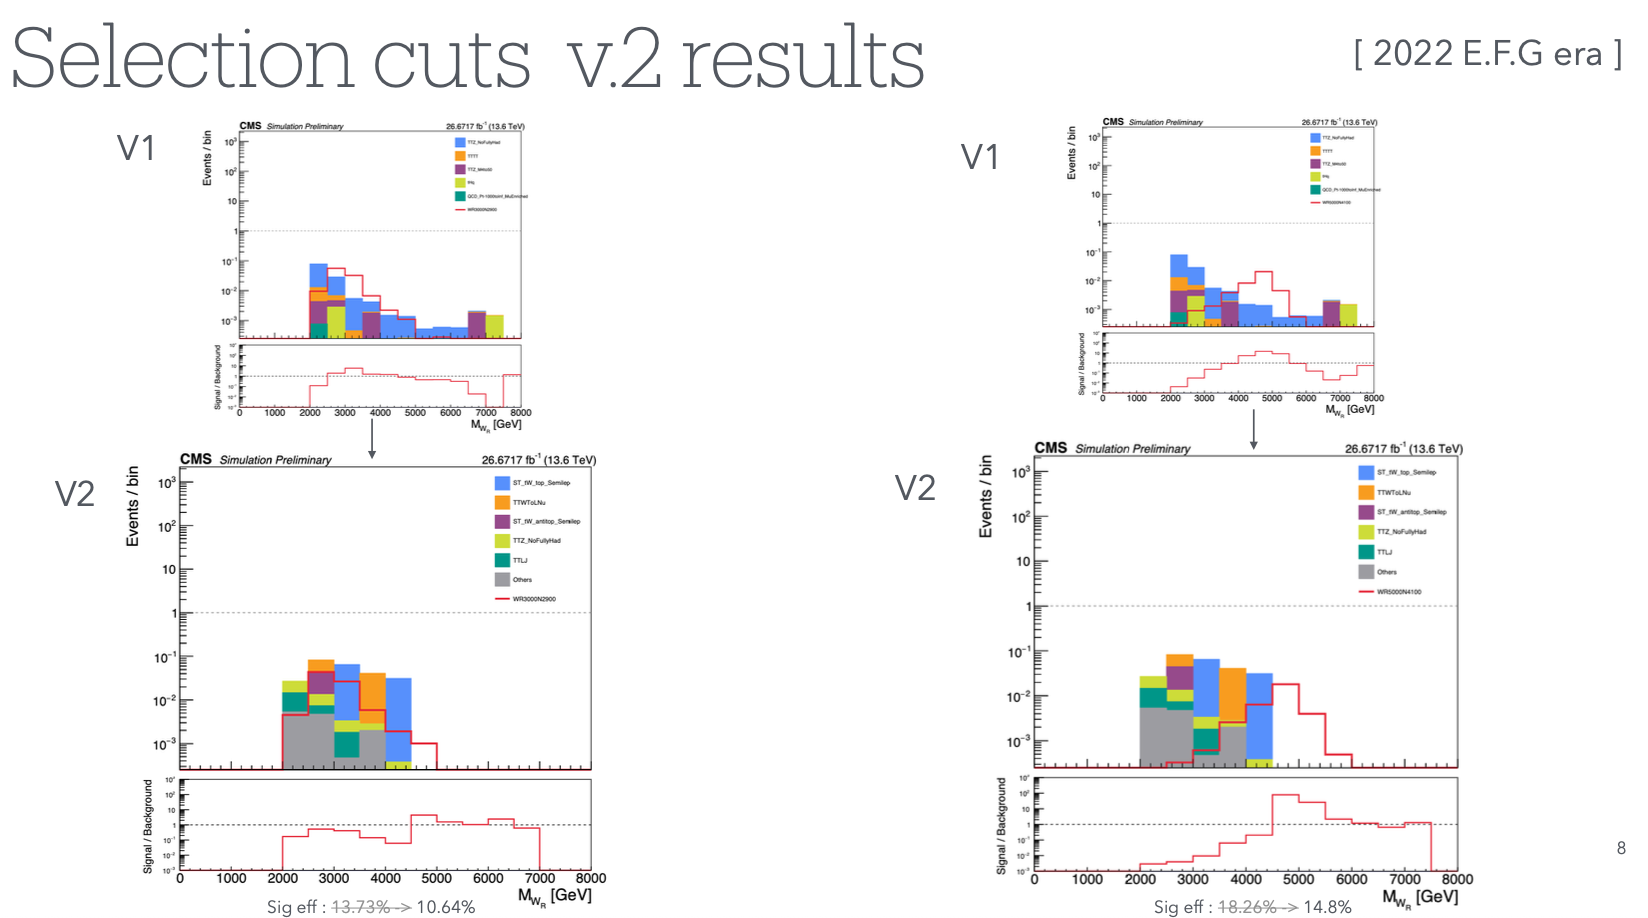
3.1.2 v2
-
Use Trigger for muon with HLT_Mu50 HLT_HighPtTkMu100 - Muon ID using both high pt id and tkIsoId
- muon pt/eta 50/2.5 bjet pt/eta 30/2.5
- not applied WR mass cut to check SR / CR
Applied code
#include "LRSM_TBChannel.h"

LRSM_TBChannel::LRSM_TBChannel() {}
LRSM_TBChannel::~LRSM_TBChannel() {}

void LRSM_TBChannel::initializeAnalyzer() {
    cout << "[LRSM_TBChannel::initializeAnalyzer] Starting initialization" << endl;

    // Check user flags
    RunSyst = HasFlag("RunSyst");
    RunWRCut = HasFlag("RunWRCut");

    cout << "[LRSM_TBChannel::initializeAnalyzer] RunSyst = " << RunSyst << endl;
    cout << "[LRSM_TBChannel::initializeAnalyzer] RunWRCut = " << RunWRCut << endl;

    // Set WR mass cut threshold
    if (RunWRCut) {
        WRCutThreshold = SelectionCuts::WR_CUT_2000;
    } else {
        WRCutThreshold = SelectionCuts::NO_WR_CUT;
    }

    // Muon IDs and scale factor keys
    MuonIDs.clear();
    // Use more reasonable muon IDs for standard analysis
    // POG_GLOBAL_HIGH_PT is very restrictive (for >200 GeV muons)
    // For LRSM analysis, use Tight ID + isolation
    // Your data has HighPtId=1, so use POG_TRACKER_HIGH_PT instead of POG_GLOBAL_HIGH_PT
    MuonIDs.push_back(Muon::MuonID::POG_GLOBAL_HIGH_PT);  // This matches your data (HighPtId=2)
    MuonIDs.push_back(Muon::MuonID::POG_TKISO_TIGHT);      // TkIsoId=2

    // Alternative: Use standard IDs if high-pT selection isn't critical
    // MuonIDs.push_back(Muon::MuonID::POG_TIGHT);
    // MuonIDs.push_back(Muon::MuonID::POG_PFISO_TIGHT);

    MuonIDSFKeys = {"NUM_TightID_DEN_TrackerMuons"};

    // Jet IDs
    JetIDs = {Jet::JetID::NOCUT};

    // Era-dependent trigger settings
    if (DataEra == "2016preVFP" || DataEra == "2016postVFP" || DataEra == "2018") {
        IsoMuTriggerName = "HLT_IsoMu27";
        TriggerSafePtCut = 29.;
    } else if (DataEra == "2017") {
        IsoMuTriggerName = "HLT_IsoMu27";
        TriggerSafePtCut = 29.;
    } else if (DataEra == "2022") {
        Trigger1  = "HLT_Mu50";
        Trigger2  = "HLT_CascadeMu100";
        Trigger3  = "HLT_HighPtTkMu100";
        TriggerSafePtCut = 52.;
    } else if (DataEra == "2022EE") {
        Trigger1  = "HLT_Mu50";
        Trigger2  = "HLT_CascadeMu100";
        Trigger3  = "HLT_HighPtTkMu100";
        TriggerSafePtCut = 52.;
    } else if (DataEra == "2023") {
        Trigger1  = "HLT_Mu50";
        Trigger2  = "HLT_CascadeMu100";
        Trigger3  = "HLT_HighPtTkMu100";
        TriggerSafePtCut = 52.;
    } else if (DataEra == "2023BPix") {
        Trigger1  = "HLT_Mu50";
        Trigger2  = "HLT_CascadeMu100";
        Trigger3  = "HLT_HighPtTkMu100";
        TriggerSafePtCut = 52.;
    } else {
        cerr << "[LRSM_TBChannel::initializeAnalyzer] DataEra is not set properly: " << DataEra << endl;
        exit(EXIT_FAILURE);
    }

    //cout << "[LRSM_TBChannel::initializeAnalyzer] IsoMuTriggerName = " << IsoMuTriggerName << endl;
    cout << "[LRSM_TBChannel::initializeAnalyzer] TriggerSafePtCut = " << TriggerSafePtCut << endl;

    // Initialize corrections
    myCorr = new MyCorrection(DataEra, DataPeriod, IsDATA ? DataStream : MCSample, IsDATA);

    // Initialize systematic helper
    string SKNANO_HOME = getenv("SKNANO_HOME");
    if (IsDATA) {
        systHelper = std::make_unique<SystematicHelper>(SKNANO_HOME + "/docs/noSyst.yaml", DataStream, DataEra);
    } else {
        systHelper = std::make_unique<SystematicHelper>(SKNANO_HOME + "/docs/ExampleSystematic.yaml", MCSample, DataEra);
    }

    cout << "[LRSM_TBChannel::initializeAnalyzer] Initialization complete" << endl;
}

void LRSM_TBChannel::executeEvent() {
    // Get all physics objects at the beginning to save CPU time
    AllMuons = GetAllMuons();
    AllJets = GetAllJets();
    AllFatJets = GetAllFatJets();


    // Loop over systematic sources
    for (const auto &syst_dummy : *systHelper) {
        executeEventFromParameter();
    }
}

void LRSM_TBChannel::executeEventFromParameter() {
    const TString this_syst = systHelper->getCurrentSysName();

    // Get event information
    Event ev = GetEvent();
    FillHist(this_syst + "/CutFlow", 0.0, 1.0, 10, 0., 10.); // Initial event
    // Apply HLT trigger
    if (!(ev.PassTrigger(Trigger1)||ev.PassTrigger(Trigger2)||ev.PassTrigger(Trigger3))) return;

    FillHist(this_syst + "/CutFlow", 1.0, 1.0, 10, 0., 10.); // HLT pass

    // Copy physics objects for systematic variations
    RVec<Muon> muons = AllMuons;
    RVec<Jet> jets = AllJets;
    RVec<FatJet> fatjets = AllFatJets;

    // Muon Id pass
    bool hasGoodMuon = false;

    for (const auto& muon : muons) {
        // Debug output to see actual ID values
        FillHist(this_syst + "/MuonhighPtid",muon.PassID(MuonIDs[0]), 1.0, 10, -5., 5.);
        FillHist(this_syst + "/Muonisoid",muon.PassID(MuonIDs[1]), 1.0, 10, -5., 5.);

        // Fill additional histograms to understand what IDs are available
        FillHist(this_syst + "/Muon_HighPtId", (int)muon.HighPtId(), 1.0,  10, -5., 5.);
        FillHist(this_syst + "/Muon_TkIsoId", (int)muon.TkIsoId(), 1.0,  10, -5., 5.);
        FillHist(this_syst + "/Muon_TightId", muon.isPOGTightId(), 1.0, 3, 0., 3.);
        FillHist(this_syst + "/Muon_MediumId", muon.isPOGMediumId(), 1.0, 3, 0., 3.);
        FillHist(this_syst + "/Muon_LooseId", muon.isPOGLooseId(), 1.0, 3, 0., 3.);

        if (muon.PassID(MuonIDs[1]) and muon.PassID(MuonIDs[0]) ) {
            hasGoodMuon = true;
            break;
        }
    }
    if (!hasGoodMuon) return;

    // Apply muon selection
    FillHist(this_syst + "/CutFlow", 2.0, 1.0, 10, 0., 10.); // 2 muons
    muons = RemoveOverlap(muons);
    // Require more than 2 muons
    if (muons.size() < 2) return;

    // Sort muons by pT
    sort(muons.begin(), muons.end(), PtComparing);

    // Apply kinematic cuts
    if (!PassKinematicCuts(muons)) return;

    FillHist(this_syst + "/CutFlow", 3.0, 1.0, 10, 0., 10.); // Kinematic cuts

    // Apply dilepton mass cut
    if (!PassDileptonMassCut(muons)) return;

    Muon muon1 = muons[0];
    Muon muon2 = muons[1];
    muon_overlap_cleaned = { muon1, muon2 };


    FillHist(this_syst + "/CutFlow", 4.0, 1.0, 10, 0., 10.); // Dilepton mass cut


    // Select fat jets and remove overlaps
    // FatJet selection - using basic kinematic cuts for now
    RVec<FatJet> selected_fatjets;
    for (const auto& fj : fatjets) {
        if (fj.Pt() > cuts.fatjet_pt && abs(fj.Eta()) < cuts.fatjet_eta) {
            selected_fatjets.push_back(fj);
        }
    }
    fatjets = selected_fatjets;
    FillHist(this_syst + "/FatJetnum", fatjets.size(), 1.0, 10, 0., 10.);
    fatjets = RemoveOverlapWithMuonsFatJet(fatjets, muon_overlap_cleaned);
    FillHist(this_syst + "/FatJetnum_afterOverlap", fatjets.size(), 1.0, 10, 0., 10.);
    RVec<FatJet> topjets = SelectTopTaggedJets(fatjets);
    FillHist(this_syst + "/Topjetnum", topjets.size(), 1.0, 10, 0., 10.);
    for (const auto& fatjet : fatjets) {
        // Using basic mass cuts for top tagging - update with actual tagger when available
        float toptag_score1 = fatjet.GetTaggerResult(JetTagging::FatJetTaggingtype::ParticleNetWithMass, JetTagging::FatjetTaggingObject::TvsQCD); // placeholder
        float softdrop_mass1 = fatjet.SDMass();
        FillHist(this_syst + "/FatJet_SoftDropMass", softdrop_mass1, 1.0, 100, 0., 1000.);
        FillHist(this_syst + "/FatJet_TopTagScore", toptag_score1, 1.0, 100, 0., 1.);

    }
    for (const auto& topjet : topjets) {
        float toptag_score2 = topjet.GetTaggerResult(JetTagging::FatJetTaggingtype::ParticleNetWithMass, JetTagging::FatjetTaggingObject::TvsQCD);
        float softdrop_mass2 = topjet.SDMass();
        FillHist(this_syst + "/topJet_SoftDropmass", softdrop_mass2, 1.0, 100, 0., 1000.);
        FillHist(this_syst + "/topJet_TopTagScore", toptag_score2, 1.0, 100, 0., 1.);
    }
    if (topjets.size() < 1) return;
    sort(topjets.begin(), topjets.end(), PtComparing);
    RVec<FatJet> leading_topjet = {topjets[0]};
    FillHist(this_syst + "/CutFlow", 5.0, 1.0, 10, 0., 10.);
    // Remove overlap between jets and fat jets
    jets = SelectJets(jets, JetIDs[0], cuts.jet_pt, cuts.jet_eta);
    jets = RemoveOverlapWithMuons(jets, muon_overlap_cleaned);
    jets = RemoveOverlapWithFatJets(jets, leading_topjet);
    RVec<Jet> bjets = SelectBTaggedJets(jets);
    sort(bjets.begin(), bjets.end(), PtComparing);
    if (bjets.size() < 1 ) return;
    RVec<Jet> leading_bjet = {bjets[0]};

    FillHist(this_syst + "/CutFlow", 6.0, 1.0, 10, 0., 10.); // b-jet and top-jet


    // Calculate invariant masses
    float wr_mass = CalculateWRMass(muon_overlap_cleaned, leading_bjet, leading_topjet);
    float dilepton_mass = (muon_overlap_cleaned[0] + muon_overlap_cleaned[1]).M();

    // Apply WR mass cut if requested
    if ( wr_mass >2000) return;

    FillHist(this_syst + "/CutFlow", 7.0, 1.0, 10, 0., 10.); // WR mass cut (if applied)

    // Event weight calculation
    float weight = 1.0;
    if (!IsDATA) {
        weight *= MCweight();
        weight *= ev.GetTriggerLumi("Full");
        FillHist(this_syst + "/WRMass_" + this_syst, wr_mass, weight, 2000, 0., 2000.);
        FillHist(this_syst + "/DileptonMass_" + this_syst, dilepton_mass, weight, 3000, 0., 3000.);
        FillHist(this_syst + "/LeadingMuonPt_" + this_syst, muon_overlap_cleaned[0].Pt(), weight, 3000, 0., 3000.);
        FillHist(this_syst + "/SubleadingMuonPt_" + this_syst, muon_overlap_cleaned[1].Pt(), weight, 3000, 0., 3000.);
        FillHist(this_syst + "/LeadingBJetPt_" + this_syst, leading_bjet[0].Pt(), weight, 3000, 0., 3000.);
        FillHist(this_syst + "/LeadingTopJetPt_" + this_syst, leading_topjet[0].Pt(), weight, 3000, 0., 3000.);

        // Apply systematic weights
        //unordered_map<std::string, float> weight_map = systHelper->calculateWeight();
        //for (const auto &w : weight_map) {
        //    TString weight_suffix = w.first;
        //    float total_weight = weight * w.second;

            // Fill histograms with systematic weights
        //    FillHist(this_syst + "/WRMass_" + weight_suffix, wr_mass, total_weight, 100, 0., 8000.);
            //FillHist(this_syst + "/DileptonMass_" + weight_suffix, dilepton_mass, total_weight, 100, 0., 8000.);
            //FillHist(this_syst + "/LeadingMuonPt_" + weight_suffix, muons[0].Pt(), total_weight, 100, 0., 8000.);
            //FillHist(this_syst + "/SubleadingMuonPt_" + weight_suffix, muons[1].Pt(), total_weight, 100, 0., 8000.);
            //FillHist(this_syst + "/LeadingBJetPt_" + weight_suffix, leading_bjet[0].Pt(), total_weight, 100, 0., 8000.);
            //FillHist(this_syst + "/LeadingTopJetPt_" + weight_suffix, leading_topjet[0].Pt(), total_weight, 100, 0., 8000.);
        //}
    } else {
        // For data, only fill nominal histograms
        FillHist(this_syst + "/WRMass_" + this_syst, wr_mass, weight, 2000, 0., 2000.);
        FillHist(this_syst + "/DileptonMass_" + this_syst, dilepton_mass, weight, 3000, 0., 3000.);
        FillHist(this_syst + "/LeadingMuonPt_" + this_syst, muon_overlap_cleaned[0].Pt(), weight, 3000, 0., 3000.);
        FillHist(this_syst + "/SubleadingMuonPt_" + this_syst, muon_overlap_cleaned[1].Pt(), weight, 3000, 0., 3000.);
        FillHist(this_syst + "/LeadingBJetPt_" + this_syst, leading_bjet[0].Pt(), weight, 3000, 0., 3000.);
        FillHist(this_syst + "/LeadingTopJetPt_" + this_syst, leading_topjet[0].Pt(), weight, 3000, 0., 3000.);
    }
}

// Helper function implementations


RVec<Jet> LRSM_TBChannel::SelectBTaggedJets(const RVec<Jet>& jets) {
    RVec<Jet> btagged_jets;
    for (const auto& jet : jets) {
        if (jet.GetBTaggerResult(JetTagging::JetFlavTagger::ParticleNet) > cuts.btag_wp) {
            btagged_jets.push_back(jet);
        }
    }
    return btagged_jets;
}

RVec<FatJet> LRSM_TBChannel::SelectTopTaggedJets(const RVec<FatJet>& fatjets) {
    RVec<FatJet> toptagged_jets;
    for (const auto& fatjet : fatjets) {
        // Using basic mass cuts for top tagging - update with actual tagger when available
        float toptag_score = fatjet.GetTaggerResult(JetTagging::FatJetTaggingtype::ParticleNetWithMass, JetTagging::FatjetTaggingObject::TvsQCD); // placeholder
        float softdrop_mass = fatjet.SDMass();

        if (toptag_score > cuts.toptag_score &&
            softdrop_mass > cuts.toptag_mass_low &&
            softdrop_mass < cuts.toptag_mass_high) {
            toptagged_jets.push_back(fatjet);
        }
    }
    return toptagged_jets;
}

RVec<Muon> LRSM_TBChannel::RemoveOverlap(const RVec<Muon>& muons, float deltaR_cut) {
    RVec<Muon> cleaned_muons;
    for (size_t i = 0; i < muons.size(); ++i) {
        bool overlaps = false;
        for (size_t j = i + 1; j < muons.size(); ++j) {
            if (muons[i].DeltaR(muons[j]) < deltaR_cut) {
                overlaps = true;
                break;
            }
        }
        if (!overlaps) {
            cleaned_muons.push_back(muons[i]);
        }
    }
    return cleaned_muons;
}

RVec<Jet> LRSM_TBChannel::RemoveOverlapWithMuons(const RVec<Jet>& jets, const RVec<Muon>& muons, float deltaR_cut) {
    RVec<Jet> cleaned_jets;
    for (const auto& jet : jets) {
        bool overlaps = false;
        for (const auto& muon : muons) {
            if (jet.DeltaR(muon) < deltaR_cut) {
                overlaps = true;
                break;
            }
        }
        if (!overlaps) {
            cleaned_jets.push_back(jet);
        }
    }
    return cleaned_jets;
}

RVec<Jet> LRSM_TBChannel::RemoveOverlapWithFatJets(const RVec<Jet>& jets, const RVec<FatJet>& fatjets, float deltaR_cut) {
    RVec<Jet> cleaned_jets;
    for (const auto& jet : jets) {
        bool overlaps = false;
        for (const auto& fatjet : fatjets) {
            if (jet.DeltaR(fatjet) < deltaR_cut) {
                overlaps = true;
                break;
            }
        }
        if (!overlaps) {
            cleaned_jets.push_back(jet);
        }
    }
    return cleaned_jets;
}

RVec<FatJet> LRSM_TBChannel::RemoveOverlapWithMuonsFatJet(const RVec<FatJet>& fatjets, const RVec<Muon>& muons, float deltaR_cut) {
    RVec<FatJet> cleaned_fatjets;
    for (const auto& fatjet : fatjets) {
        bool overlaps = false;
        for (const auto& muon : muons) {
            if (fatjet.DeltaR(muon) < deltaR_cut) {
                overlaps = true;
                break;
            }
        }
        if (!overlaps) {
            cleaned_fatjets.push_back(fatjet);
        }
    }
    return cleaned_fatjets;
}

bool LRSM_TBChannel::PassKinematicCuts(const RVec<Muon>& muons) {
    if (muons.size() < 2) return false;

    // Leading muon pT cut
    if (muons[0].Pt() <= 50 ) return false;

    // Eta cuts
    for (const auto& muon : muons) {
        if (fabs(muon.Eta()) >= cuts.muon_eta) return false;
    }

    return true;
}

bool LRSM_TBChannel::PassDileptonMassCut(const RVec<Muon>& muons) {
    if (muons.size() < 2) return false;

    float dilepton_mass = (muons[0] + muons[1]).M();
    return dilepton_mass > cuts.dilepton_mass_cut;
}

float LRSM_TBChannel::CalculateWRMass(const RVec<Muon>& muons, const RVec<Jet>& bjets, const RVec<FatJet>& topjets) {
    if (muons.size() < 2 || bjets.size() < 1 || topjets.size() < 1) return -1.0;

    Particle wr_candidate = muons[0] + muons[1] + bjets[0] + topjets[0];
    return wr_candidate.M();
}
3.2 CR setting
3.2.1 introduce
main background is ttbar . variable can be set with m(lljJ) For low mass , ttbar and High mass , OF ttbar could be good. top jet number should be one? + t and b jet delta r –> check which is main bkg
Summary and Conclusions
This analysis presents a comprehensive study of the LRSM WR→tb channel, focusing on the WR ~ N mass region to optimize signal reconstruction and background rejection. Key findings include:
- Kinematic Understanding: The WR ~ N mass region provides better separation of decay products compared to the highly boosted regime
- Top Jet Reconstruction: AK8 jets with ParticleNet top tagging achieve ~55-40% efficiency after cleaning
- B-jet Identification: AK4 b-jets can be identified with moderate efficiency using geometric matching and flavor tagging
- Lepton Selection: High-pT muon triggers and tight ID requirements are essential for signal selection
- Background Challenges: Careful optimization of selection cuts is needed to maintain sensitivity while allowing for scale factor measurements
Future work should focus on optimizing the selection criteria and developing data-driven background estimation methods.
Appendix A: Technical Details
A.1 Software and Analysis Framework
Analysis Tools:
- MadGraph for signal generation
- ROOT framework for data analysis
- NanoAOD format for event storage
- ParticleNet for top/b-tagging
A.2 Selection Criteria Summary
Final Recommended Cuts:
| Object | Selection Criteria | Efficiency |
|---|---|---|
| Muons | pT > 50 GeV, HighPtID=2, tkIsoId=2 | ~90% |
| AK8 Jets | pT > 200 GeV, ParticleNet > 0.9, 120 < SDM < 250 GeV | ~55-40% |
| AK4 b-jets | pT > 30 GeV, DeepJet Tight WP | ~8% |
| HLT | HLT_Mu50 OR HLT_HighPtTkMu100 OR HLT_CascadeMu100 | ~95% |
A.3 Systematic Uncertainties
Expected Sources:
- Jet Energy Scale/Resolution
- b-tagging scale factors
- Top-tagging scale factors
- Muon ID/trigger scale factors
- Luminosity uncertainty
- PDF uncertainties
A.4 Background Composition
Dominant Backgrounds:
- tt̄ + jets (dominant)
- Single top
- tt̄ + V (V = W, Z)
- tt̄ + H
- Diboson production
A.5 Signal Optimization Strategy
Mass-dependent Approach:
- WR ~ N region: Resolved analysis with separated objects
- High WR region: Boosted analysis with merged jets
- Transition region: Hybrid approach
References
- CMS Collaboration, “Search for heavy right-handed W bosons in events with an electron and missing transverse momentum” (EXO-20-002)
- CMS Top Tagging Working Group recommendations
- CMS B-tagging Performance Studies, Summer22
- CMS Muon Performance Studies, Run 3
- Left-Right Symmetric Model theoretical framework
Document optimized for Claude Code analysis and PDF conversion